 03UniApp框架教程
# UniApp框架教程
# 1、uView-2版本安装和创建项目
全局安装vue-cli
npm install -g @vue/cli
1
使用正式版(对应HBuilderX最新正式版)
vue create -p dcloudio/uni-preset-vue my-project1使用alpha版(对应HBuilderX最新alpha版)
vue create -p dcloudio/uni-preset-vue#alpha my-alpha-project1使用Vue3/Vite版
创建以 javascript 开发的工程(如命令行创建失败,请直接访问gitee (opens new window)下载模板)
npx degit dcloudio/uni-preset-vue#vite my-vue3-project1创建以 typescript 开发的工程(如命令行创建失败,请直接访问gitee (opens new window)下载模板)
npx degit dcloudio/uni-preset-vue#vite-ts my-vue3-project1
此时,会提示选择项目模板(使用Vue3/Vite版不会提示,目前只支持创建默认模板),初次体验建议选择
hello uni-app项目模板,如下所示:
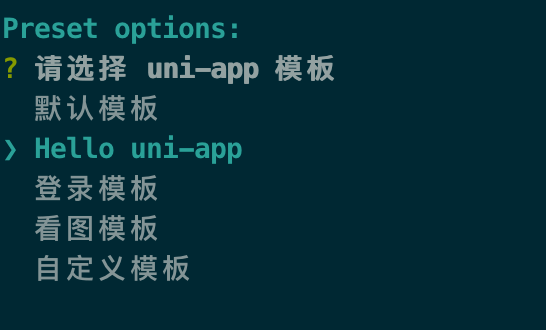
选择自定义模板时,需要填写 uni-app 模板地址,这个地址其实就是托管在云端的仓库地址。以 GitHub 为例,地址格式为 userName/repositoryName,如 dcloudio/uni-template-picture 就是下载图片模板。
更多支持的下载方式,请参考这个插件的说明:download-git-repo (opens new window)
# 2、tabBar (opens new window)
	"tabBar": {
		"custom": false,
		"color": "#fff",
		"selectedColor": "#e3e3e3",
		"backgroundColor": "#00b26a",
		"list": [{
				"pagePath": "pages/index/index",
				"text": "首页",
				"iconPath": "/pages/img/b1.png",
				"selectedIconPath": "/pages/img/b1.png"
			},
			{
				"pagePath": "pages/test/test",
				"text": "测试",
				"iconPath": "/pages/img/b2.png",
				"selectedIconPath": "/pages/img/b2.png"
			}
		]
	},
1
2
3
4
5
6
7
8
9
10
11
12
13
14
15
16
17
18
19
2
3
4
5
6
7
8
9
10
11
12
13
14
15
16
17
18
19
# 3、渲染数据
简单渲染
//pages/index/index.vue
<template>
  <view>
    {{ title }}
  </view>
</template>

<script>
export default {
  data() {
    return {
      title: "Hello",
    };
  },
};
</script>
1
2
3
4
5
6
7
8
9
10
11
12
13
14
15
16
2
3
4
5
6
7
8
9
10
11
12
13
14
15
16
数组渲染
//pages/index/index.vue
<template>
  <view class="content">
    <view v-for="(item, idx) of arr" :key="idx">
      {{ item }}
    </view>
  </view>
</template>

<script>
export default {
  data() {
    return {
      arr: [1, 2, 3, 4, 5],
    };
  },
};
</script>
1
2
3
4
5
6
7
8
9
10
11
12
13
14
15
16
17
18
2
3
4
5
6
7
8
9
10
11
12
13
14
15
16
17
18
# 4、tabBar (opens new window)
	"tabBar": {
		"custom": false,
		"color": "#fff",
		"selectedColor": "#e3e3e3",
		"backgroundColor": "#00b26a",
		"list": [{
				"pagePath": "pages/index/index",
				"text": "首页",
				"iconPath": "/pages/img/b1.png",
				"selectedIconPath": "/pages/img/b1.png"
			},
			{
				"pagePath": "pages/test/test",
				"text": "测试",
				"iconPath": "/pages/img/b2.png",
				"selectedIconPath": "/pages/img/b2.png"
			}
		]
	},
1
2
3
4
5
6
7
8
9
10
11
12
13
14
15
16
17
18
19
2
3
4
5
6
7
8
9
10
11
12
13
14
15
16
17
18
19
# 5、插件
luch-request (opens new window)
插件安装路径,都放在这个文件plugins
配置
//utils/request.js
import Request from '@/plugins/luch-request/index.js' // 下载的插件

export const http = new Request();
1
2
3
4
2
3
4
用法
import {http} from "@/utils/request.js"
expect default{
onLoad(){
    http.request({
        url:"http://vt.ossjk.com/goods/getIndexInfo"
    }).then((res)=>{
        console.log(res)
    })
  }
}
1
2
3
4
5
6
7
8
9
10
2
3
4
5
6
7
8
9
10
# 6、uView-UI使用
插件安装路径,都放在这个文件plugins
1. 引入uView主JS库
// main.js
import uView from '@/plugins/uview-ui'
Vue.use(uView)

2. 在引入uView的全局SCSS主题文件
//根目录的uni.scss
/* uni.scss */
@import '@/plugins/uview-ui/theme.scss';

3. 引入uView基础样式
//在根目录App.vue中首行的位置引入
<style lang="scss">
	/* 注意要写在第一行,同时给style标签加入lang="scss"属性 */
	@import "@/plugins/uview-ui/index.scss";
</style>

4. 配置easycom组件模式
// pages.json
"easycom": {
"^u-(.*)": "@/plugins/uview-ui/components/u-$1/u-$1.vue"
},
1
2
3
4
5
6
7
8
9
10
11
12
13
14
15
16
17
18
19
20
21
22
2
3
4
5
6
7
8
9
10
11
12
13
14
15
16
17
18
19
20
21
22
# 使用组件
<u-button type="primary" text="确定"></u-button>
1
# 7、uView-1版本安装&使用
先安装uniapp-1版本
首先下载压缩包,然后解压到
plugins文件里面
- 配置步骤跟以上一样
# 底部导航栏 (opens new window)
封装
//components/tabBar.vue
<template>
	<view>
		<!-- 下部导航栏 -->
		<u-tabbar v-model="current" :list="list"></u-tabbar>
	</view>
</template>

<script>
	export default {
	data() {
			return {
				list: [{
						iconPath: "home",
						selectedIconPath: "home-fill",
						text: '首页',
						customIcon: false,
						pagePath:"/pages/index/index"
					},
					{
						iconPath: "account",
						selectedIconPath: "account-fill",
						text: '我的',
						customIcon: false,
						pagePath:"/pages/list/list"
					},
				],
				current: 0
			}
		},
	}
</script>

<style>

</style>
1
2
3
4
5
6
7
8
9
10
11
12
13
14
15
16
17
18
19
20
21
22
23
24
25
26
27
28
29
30
31
32
33
34
35
36
2
3
4
5
6
7
8
9
10
11
12
13
14
15
16
17
18
19
20
21
22
23
24
25
26
27
28
29
30
31
32
33
34
35
36
//根目录下pages.json
"pages": [ //pages数组中第一项表示应用启动页,参考:https://uniapp.dcloud.io/collocation/pages
		{
			"path": "pages/index/index",
			"style": {
				"navigationBarTitleText": "首页"
			}
		},
		{
			"path": "pages/list/list",
			"style": {
				"navigationBarTitleText": "列表"
			}
		}
	],
	"tabBar": {
		"list": [{
				"pagePath": "pages/index/index",
				"text": "首页"
			},
			{
				"pagePath": "pages/list/list",
				"text": "测试"
			}
		]
	},
1
2
3
4
5
6
7
8
9
10
11
12
13
14
15
16
17
18
19
20
21
22
23
24
25
26
2
3
4
5
6
7
8
9
10
11
12
13
14
15
16
17
18
19
20
21
22
23
24
25
26
使用
//pages/index/index.vue
//pages/list/list.vue
<template>
	<view>
		<!-- 下部导航栏 -->
		<tab-bar></tab-bar>
	</view>
</template>

<script>
	import tabBar from "@/components/tabBar.vue"
	export default {
		components:{
			tabBar,
		}
	}
</script>
1
2
3
4
5
6
7
8
9
10
11
12
13
14
15
16
17
2
3
4
5
6
7
8
9
10
11
12
13
14
15
16
17
编辑 (opens new window)
上次更新: 2023/08/06, 00:38:41