 react基础笔记
# react基础笔记
# 1. git获取代码相关
# 1-1. 首次clone代码
选择一个文件夹,右键打开window 终端,执行
git clone https://gitee.com/yuonly0528/sh230320.git1
# 1-2. 拉取最新的老师代码
点击 ... 选择 pull 获取最新线上代码
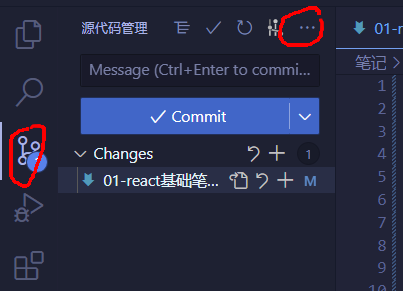
# 1-3. 如果拉取失败
拉取失败解决方案:
- 放弃目录所有变更

- 删除当前目录,重新克隆【执行1-1步骤】
# 2. react基本使用
- 导入 React对象
- 导入ReactDOM对象
- 提供react渲染的舞台【真实dom元素】
- 创建react的根节点[ ReactDOM.createRoot]
- 使用render方法渲染
<!DOCTYPE html>
<html lang="en">
<head>
    <meta charset="UTF-8">
    <meta http-equiv="X-UA-Compatible" content="IE=edge">
    <meta name="viewport" content="width=device-width, initial-scale=1.0">
    <title>Document</title>
    <!--1. 得到一个全局对象 React 提供了react核心的方法-->
    <script src="./lib/react.development.js"></script>
    <!--1. 得到一个全局对象 ReactDOM,用来操作 dom的 -->
    <script src="./lib/react-dom.development.js"></script>
</head>
<body>
    <!--2. 提供一个舞台 -->
    <div id="root"></div>

    <script>
        console.log(React);
        console.log(ReactDOM);
        // 3. 让react 和 dom建立联系
        /**
         * 创建一个根节点
         * create 创建
         * root   根
         * createRoot 创建一个根节点
         *
         */
        const root = ReactDOM.createRoot(document.getElementById('root'));
        // 4. 在根节点中使用render方法渲染,render的内容会出现在 div#root中
        root.render('我是react代码');
    </script>
</body>
</html>
2
3
4
5
6
7
8
9
10
11
12
13
14
15
16
17
18
19
20
21
22
23
24
25
26
27
28
29
30
31
32
33
# 3. 代码片段
# 3-1. 配置:
文件->首选项->配置用户代码片段->新代码片段->回车【创建一个代码片段文件】
复制粘贴以下内容
prefix:唤醒词
scope: 生效的文件
body: [] 生成的代码
$1 $2 光标停留的位置
{

	"react模板":{
		"prefix": "!react",
		"body": [
			"<!DOCTYPE html>",
			"<html lang=\"en\">",
			"<head>",
				"\t<meta charset=\"UTF-8\">",
				"\t<title>Title</title>",
				"\t<script src=\"./lib/react.development.js\"></script>",
				"\t<script src=\"./lib/react-dom.development.js\"></script>",
				"\t<script src=\"./lib/babel.min.js\"></script>",
			"</head>",
			"<body>",
			"\t<div id=\"root\"></div>",
			"</body>",
			"<script type=\"text/babel\">",
			"\tconst root = ReactDOM.createRoot(document.querySelector(\"#root\"));",
			"\troot.render((",
				"\t\t<div></div>",
			"\t))",
			"</script>",
			"</html>"
		],
		"description": "快速构建react模板页页面"
	},
    "react模板2":{
		"prefix": "!react2",
		"body": [
			"<!DOCTYPE html>",
			"<html lang=\"en\">",
			"<head>",
				"\t<meta charset=\"UTF-8\">",
				"\t<title>Title</title>",
				"\t<script src=\"./lib/react.development.js\"></script>",
				"\t<script src=\"./lib/react-dom.development.js\"></script>",
			"</head>",
			"<body>",
			"\t<div id=\"root\"></div>",
			"</body>",
			"<script>",
			"\tconst root = ReactDOM.createRoot(document.querySelector(\"#root\"));",
			"\troot.render((",
				"\t\t<div></div>",
			"\t))",
			"</script>",
			"</html>"
		],
		"description": "快速构建react模板页页面"
	}
}
2
3
4
5
6
7
8
9
10
11
12
13
14
15
16
17
18
19
20
21
22
23
24
25
26
27
28
29
30
31
32
33
34
35
36
37
38
39
40
41
42
43
44
45
46
47
48
49
50
51
52
# 3-2. 删除代码片段文件
- 获取路径:查看->外观->痕迹导航
- 按照目录-找到文件删除即可
# 4. 注意事项
- dom元素和react根节点必须一一对应
- render函数可以重复调用,后面的覆盖前面的
- 不要使用body 和 html作为react的根节点
<!DOCTYPE html>
<html lang="en">
<head>
    <meta charset="UTF-8">
    <title>Title</title>
    <script src="./lib/react.development.js"></script>
    <script src="./lib/react-dom.development.js"></script>
</head>
<body>
    <div id="root"></div>
</body>
<script>
    // const root = ReactDOM.createRoot(document.querySelector("#root"));

    // root.render((
    //     <div></div>
    // ))

    // 1. dom容器 和 react的根节点需要是一一对应的,虽然可以正常渲染,但是控制台会有警告
    // const root1 = ReactDOM.createRoot(document.querySelector("#root"));
    // const root2 = ReactDOM.createRoot(document.querySelector("#root"));

    // root2.render('root2')
    // root1.render('root1')

    // 2. render函数可以重复调用,后面的会覆盖前面的
    // const root = ReactDOM.createRoot(document.querySelector("#root"));
    // root.render('第一次渲染');
    // root.render('第二次渲染');

    // 3. 根节点不要使用 body 和 html
    // const root = ReactDOM.createRoot(document.body); // body
    const root = ReactDOM.createRoot(document.documentElement); // html
    root.render('第一次渲染');

</script>
</html>
2
3
4
5
6
7
8
9
10
11
12
13
14
15
16
17
18
19
20
21
22
23
24
25
26
27
28
29
30
31
32
33
34
35
36
37
# 5. 虚拟dom和真实dom 的区别
操作真实dom,当改变dom元素的几何属性的时候,会导致自身及相关元素位置的重新计算,这个重新计算的过程叫做重排,重排后重新渲染的过程叫做重绘。
操作真实dom的弊端,会导致大量的重排和重绘,效率较低
react引入虚拟dom 的概念,可以减少页面的重排和重绘
虚拟dom:
- 本质就是一个对象:属性较少【9个属性】
- 虚拟dom有的属性和真实dom的属性是一一对应的
- 虚拟dom通过render方法,可以转化为真实dom
- 在react中,虚拟dom 也称之为 react元素
- 在react中如何创建虚拟dom? 5-1. React.createElement 5-2. jsx 创建
注意:真实dom本质也是一个对象,属性较多200多个
# 6. createElement创建react元素
React.createElement(标签名,标签属性, 子元素1, 子元素2,....)
如果没有属性,怎么创建?第二个参数需要占位 {}、null、undefined
特殊属性className
<font color='red'>弊端:</font>当创建复杂页面结构,标签需要嵌套的时候,写法非常的麻烦,所以,引入了jsx语法,用来快速创建复杂页面的结构的react元素
const root = ReactDOM.createRoot(document.querySelector("#root"));
/**
 * 创建react元素[虚拟dom]
 * create:创建
 * Element:元素
 * React.createElement(标签名,标签属性, 子元素1, 子元素2,....)
 *
 */
const oDiv = React.createElement('div',{id:'box', school:'atguigu'},'我是div','我真的是div')

console.log('oDiv: ', oDiv);// oDiv就是一个对象  type是标签名 props属性 props.children子元素

root.render(oDiv);// 通过render方法,将react元素渲染到页面
// 如果没有属性,怎么创建?第二个参数需要占位 {}、null、undefined

// const oSpan = React.createElement('span',{},'我是span标签');
// const oSpan = React.createElement('span',null,'我是span标签');
// const oSpan = React.createElement('span',undefined,'我是span标签');

// 用任何值占位都可以,但是不推荐,推荐以上三种
// const oSpan = React.createElement('span',[],'我是span标签');
// const oSpan = React.createElement('span',1231232132435,'我是span标签');
root.render(oSpan);
2
3
4
5
6
7
8
9
10
11
12
13
14
15
16
17
18
19
20
21
22
23
- 特殊属性className
const root = ReactDOM.createRoot(document.querySelector("#root"));
    // 属性:普通属性、自定义属性
    const oDiv = React.createElement('div', { id: 'box', school: 'atguigu',className:'wrapper' }, '内容');

    /**
     * 特殊属性className
     * class 是 es6 定义类的关键字,为什么clas使用className?
     * 虚拟dom真实dom属性一一对应的,虚拟dom最终会转化为真实dom,所以真实dom用的是className
     *
     */
    root.render(oDiv)

	// 真实dom用的就是className
    console.dir(document.querySelectorAll('.rapper')[0]);
2
3
4
5
6
7
8
9
10
11
12
13
14
# 7. jsx
jsx = xml + js;
<user>
	<name>迪丽热巴</name>
    <age>30</age>
</user>

xml:使用自定义标签的形式表示数据,后来被json格式取代
1
2
3
4
5
6
jsx是react特有的语法
作用:是快速创建react元素
需要用babel编译成浏览器可识别的js代码,编译后的代码还是 React.createElement的方式
jsx如何使用:
- 导入babel
- script标签增加 type='text/babel'
- jsx 外可以加 (),方便代码快速格式化
注意:jsx 只能写两种标签
- 全部小写:浏览器可识别的html标签
- 首字母大写的标签:
, 会将User当做 react组件来处理,如果User组件没有定义,那么会报错
- jsx基本使用
<!DOCTYPE html>
<html lang="en">

<head>
    <meta charset="UTF-8">
    <title>Title</title>
    <script src="./lib/react.development.js"></script>
    <script src="./lib/react-dom.development.js"></script>
    <script src="./lib/babel.min.js"></script>
</head>

<body>
    <div id="root"></div>
</body>

<script type="text/babel">
    /**
     * jsx: xml + js 的混合语法
     * 是react特有的,用来创建react元素[虚拟dom],作用跟 React.createElement一样
     */
    const root = ReactDOM.createRoot(document.querySelector("#root"));
    const oDiv = (
        <div className="wrapper">
            <div className="swipper">
                <h3>我是轮播图</h3>
                <p>我是文字</p>
            </div>
            <span>我是span</span>
            <span>我也是span</span>
        </div>
    )
    console.log(oDiv);
    root.render(oDiv);
</script>
</html>
2
3
4
5
6
7
8
9
10
11
12
13
14
15
16
17
18
19
20
21
22
23
24
25
26
27
28
29
30
31
32
33
34
35
# 8. jsx中的插值表达式
语法:
{js表达式}
- js表达式和js语句的区别?
<font color='red'>js表达式都是有值的</font>,可以用变量接收或者 使用 console进行打印js语句是控制代码执行顺序的,是没有值的,不能存入变量也不能打印
js表达式包括:
- 常量、变量:
number、string、null、undefined、boolean、object - 三元表达式
- 逻辑运算表达式
- 函数调用
- 常量、变量:
js语句包括
- 赋值语句:
var a = 1; if ...elseswitch case- 循环语句等
- 赋值语句:
jsx 中的 插值表达式语法:
{ js表达式 }
   - number:正常输出   `{123}`

   - string:正常输出      ` {'abc'}`

   - 不输出任何内容: `{true} {false} {null} {undefined}`

   - 对象会报错 : `{{name:'atguigu'}}`
   - 数组: 遍历每一个元素输出 `{[1,2,3,4]}`
2
3
4
5
6
7
8
9
- 逻辑运算:
   - && 运算:

     整体表达式的值 =  表达式1 && 表达式2

     1. 整体表达式的值,需要看表达式1 的布尔值,如果表达式1 的布尔值为真,那么整体表达式的值就是表达式2的值
     2. 如果表达式1的布尔值为假,整体表达式的值就是表达式1的值

     5 && 8   0 && 19

   - || 运算:

     整体表达式的值 =  表达式1  || 表达式2

     1. 整体表达式的值,需要看表达式1 的布尔值,如果表达式1 的布尔值为真,那么整体表达式的值就是表达式 1 的值
     2. 如果表达式1的布尔值为假,整体表达式的值就是表达式 2 的值
2
3
4
5
6
7
8
9
10
11
12
13
14
15
16
三元表达式:
let isLoading = true;
<div>{isLoading ? '加载中....' : '内容'}</div>
1
2函数调用:
function fn(){

}
function f1(){
    return [1,2,3]
}
function f2(){
    return {username:'atguigu'}
}

<h3>函数调用</h3>
<p>{fn()}</p>
<p>{f1()}</p>
{
    /*<p>{f2()}</p>*/
}
1
2
3
4
5
6
7
8
9
10
11
12
13
14
15
16jsx 基本数据类型输出情况
const root = ReactDOM.createRoot(document.querySelector("#root"));
let a = 123;// number
const str = 'abc';
root.render((
    <div>
        <h3>基本数据类型 number</h3>
        <p>{a}</p>
        <h3>string</h3>
        <p>{str}</p>
        <h3>boolean</h3>
        <p>true: <span>{true}</span></p>
        <p>false: <span>{false}</span></p>
        <h3>null</h3>
        <p>null: <span>{null}</span></p>

        <h3>undefined</h3>
        <p>undefined: <span>{undefined}</span></p>

        <h3>object- 对象-报错</h3>
        {/*
            <p>对象:<span>{{username:'atguigu',age:20}}</span></p>
        */}

        <h3>object - 数组</h3>
        <p>数组: {[1,2,3,4]}</p>
        <p>数组: {['a','b','c','d']}</p>
        <p>数组: {[true,false,null,undefined]}</p>
        <p>数组: {[{name:'atguigu'},{name:'迪丽热巴'}]}</p>

        <h3>三元表达式</h3>
        {isLoading ? '页面加载中.....' : '页面内容'}
        <h3>逻辑 与 运算</h3>
        {5 && 8} - {null && 200}
        {5 || 8}
        <h3>函数调用</h3>
        <p>{fn()}</p>
        <p>{f1()}</p>
        {
            /*<p>{f2()}</p>*/
        }
    </div>
))
1
2
3
4
5
6
7
8
9
10
11
12
13
14
15
16
17
18
19
20
21
22
23
24
25
26
27
28
29
30
31
32
33
34
35
36
37
38
39
40
41
42
# 8-1. 条件渲染
单分支:逻辑运算符实现
let flag = true;
if(flag){xxxx}

flag && 'xxxx'
// 函数调用
function fn(){}
function sum(fn){
    fn && fn()
}
1
2
3
4
5
6
7
8
9双分支:
if  ... else
三元表达式
1
2多分支: 一般封装成函数
const root = ReactDOM.createRoot(document.querySelector("#root"));
const flag = false;
const isLoading = false;
const oDiv = (
    <div>
        我是div
    </div>
)
function friends(age){
    if(age < 18){
        return <div>请在父母的陪同下观看</div>
    }else if(age > 18 && age < 60){
        return <div>敬请欣赏</div>
    }else if(age > 60 && age < 80){
        return <div>保重身体</div>
    }
}

// 单分支 if写法
let single = null;
if(flag){
    single = <div>一起看电影</div>
}

// 双分支  if...else
let double = null;
if(isLoading){
    double = <h3>页面正在加载中....</h3>
}else {
    double = <div>我是页面内容</div>
}

root.render((
    <div>
        <h3>前提:插值表达式也可以渲染react 元素</h3>
        {oDiv}

        <h3>单分支</h3>
        {flag && <div>一起看电影</div>}
        {single}

        <h3>双分支</h3>
        {isLoading ? <h3>页面正在加载中....</h3> : <div>我是页面内容</div>}
        {double}
        <h3>多分支</h3>
        {friends(16)}
        {friends(24)}
    </div>
))
2
3
4
5
6
7
8
9
10
11
12
13
14
15
16
17
18
19
20
21
22
23
24
25
26
27
28
29
30
31
32
33
34
35
36
37
38
39
40
41
42
43
44
45
46
47
48
49
# 8-2. 行内样式处理
style 的值必须是一个对象
如果是复合属性,需要用小驼峰命名法 backgroundColor
单位如果是px,那么可以省略,直接写数字
const root = ReactDOM.createRoot(document.querySelector("#root"));
let style = {
    color: 'red',
    border: '1px solid blue',
    backgroundColor: 'pink',
    width: '200px',
    height: 500,
    fontSize: 30
}
root.render((
    <div>
        <h3>行内样式style处理</h3>
        <div style={{ color: 'red', border: '1px solid blue', backgroundColor: 'pink', width: '200px', height: 500, fontSize: 30 }}>红色文字,蓝色边框,粉色背景</div>

        <div style={style}>我是div</div>
    </div>
))
2
3
4
5
6
7
8
9
10
11
12
13
14
15
16
17
# 8-3. class样式处理
- class是字符串:样式类名 中间用空格隔开
- class是数组:使用join(' '), 拼接字符串用空格连接
const root = ReactDOM.createRoot(document.querySelector("#root"));
let class1 = "box c1 f1"
let class2 = ['box','c1','f1'];

root.render((
    <div>
        <h3>样式类名</h3>
        <div className="box">
            box1
        </div>
        <div className="box c1 f1">box2</div>
        <h3>插值表达式处理样式</h3>
        <div className={class1}>box3</div>
        <h3>样式是一个数组</h3>
        <div className={class2}>box4</div>
        <div className={class2.join(' ')}>box5</div>
    </div>
))
2
3
4
5
6
7
8
9
10
11
12
13
14
15
16
17
18
# 8-4. 列表渲染
列表渲染的原理:根据普通数据的数组,生成一个react元素的新数组[使用map最方便],利用插值表达式渲染数组的特性,进行渲染。
列表渲染需要给每一个遍历的元素,添加一个唯一不重复的属性 key值,key值推荐使用 id,如果没有id,可以考虑使用 索引【有些情况会有问题,后面讨论】
<!DOCTYPE html>
<html lang="en">

<head>
    <meta charset="UTF-8">
    <title>Title</title>
    <script src="./lib/react.development.js"></script>
    <script src="./lib/react-dom.development.js"></script>
    <script src="./lib/babel.min.js"></script>
    <style>
        .f1{
            font-size: 20px;
            color:blue;
        }
    </style>
</head>

<body>
    <div id="root"></div>
</body>
<script type="text/babel">
    /**
     *  列表渲染,要求数据类型 99.99% 都是一个数组
     *
     *  react列表渲染的原理,就是将普通数据的数组,映射成一个react元素的数组,然后使用插值表达式渲染
     */
    const root = ReactDOM.createRoot(document.querySelector("#root"));
    let arr1 = [1, 2, 3, 4];
    // 数组中的元素,可以是react元素
    let arr2 = [<li>1</li>, <li>2</li>, <li>3</li>, <li>4</li>];

    // map ==》 返回一个新数组,新数组的长度跟原数组一样,新数组每一个元素,可以根据原数组生成,新数组的元素由回调函数的返回值决定

    let arr3 = arr1.map(item => {
        console.log('item: ', item); // 遍历时数组中的每一项
        /**
         *  次
         *  1       1
         *  2       2
         *  3       3
         *  4       4
         */
        return (
            <li>{item}</li>
        )
    })
    console.log(arr3);

    // 优化 map映射
    let arr4 = arr1.map(item => (
        <li>
            {item}
        </li>
    ))

    let users = [
        {
            id: 1,
            username: 'atguigu',
            age: 19
        },
        {
            id: 2,
            username: '迪丽热巴',
            age: 29
        },
        {
            id: 3,
            username: '古力娜扎',
            age: 20
        },
        {
            id: 4,
            username: '热依扎',
            age: 31
        }
    ]

    root.render((
        <div>
            <h3>简单数组元素渲染</h3>
            {arr1}
            <h3>将简单数组,渲染成 ul li 列表</h3>
            <ul>
                {arr1}
            </ul>
            <hr />
            <ul>
                {arr2}
            </ul>
            <hr />
            <h3>使用map映射成一个react元素的新数组</h3>
            <ul>
                {arr3}
            </ul>
            <h3>map 映射优化后, 省略return 和 { }</h3>
            <ul>
                {arr4}
            </ul>
            <h3>map 映射列表渲染终极版本</h3>
            <ul>
                {arr1.map(item => (
                    <li>{item}</li>
                ))}
            </ul>

            <hr />
            <h3>数组是对象,复杂数据类型渲染</h3>
            <ul>
                {users.map(user=>(
                    <li>
                        <h3 style={{color:'red'}}>姓名: {user.username}</h3>
                        <p className='f1'>年龄: {user.age}</p>
                    </li>
                ))}
            </ul>
        </div>
    ))
</script>
</html>
2
3
4
5
6
7
8
9
10
11
12
13
14
15
16
17
18
19
20
21
22
23
24
25
26
27
28
29
30
31
32
33
34
35
36
37
38
39
40
41
42
43
44
45
46
47
48
49
50
51
52
53
54
55
56
57
58
59
60
61
62
63
64
65
66
67
68
69
70
71
72
73
74
75
76
77
78
79
80
81
82
83
84
85
86
87
88
89
90
91
92
93
94
95
96
97
98
99
100
101
102
103
104
105
106
107
108
109
110
111
112
113
114
115
116
117
118
119
120
- key值遍历
const root = ReactDOM.createRoot(document.querySelector("#root"));
/**
 * 需求:实现评论列表功能

    li> a > [h3 p]

    - 如果有评论数据,就展示列表结构 li( 列表渲染 )要包含a标签
    - name 表示评论人,渲染 h3
    - content 表示评论内容,渲染 p
    - 如果没有评论数据,就展示一个 h1 标签,内容为: 暂无评论!
    - 用户名的字体25px, 内容的字体20px
 *
 */

const list = [
    { id: 1, name: 'jack', content: 'rose, you jump i jump', time: '03:21' },
    { id: 2, name: 'rose', content: 'jack, you see you, one day day', time: '03:22' },
    { id: 3, name: 'tom', content: 'jack,。。。。。', time: '03:23' }
]
root.render((
    <div>
        {list.length === 0 ? <h1> 暂无评论!</h1> : (
            <ul>
                {list.map(item => (
                    <li key={item.id}>
                        <a href="">
                            <h3 style={{fontSize:25}}>{item.name}</h3>
                            <p className="f20">{item.content}</p>
                        </a>
                    </li>
                ))}
            </ul>
        )}
    </div>
))
2
3
4
5
6
7
8
9
10
11
12
13
14
15
16
17
18
19
20
21
22
23
24
25
26
27
28
29
30
31
32
33
34
35
# 9. jsx中的事件
# 9-1. 原生dom事件
通过标签属性绑定事件
- 语法:on事件名="事件回调函数()" 例如:
onclick='fn()'- 事件回调函数的调用者是 window,所以this指向window
- 通过传递实参event,获取事件对象
- 阻止默认行为:e.preventDefault();
- 可以同时传递普通参数和事件对象
- 如果想获取指向按钮的this,需要通过实参传递
- 原生 oninput 事件 和 onchange事件的区别
- 触发时机不同:
- oninput: 键盘有输入就立刻触发
- onchange:内容有变化,并且失去焦点时触发
- 事件对象不同:
- oninput:InputEvent
- onchange:Event
onclick="fn()"
<body>
    <!-- window.event -->
    <p><button onclick="fn(event);">按钮1</button></p>
    <p><a href="http://baidu.com" onclick="fn(event)">百度</a></p>
    <p><button onclick="f1(1,2)">自定义参数和事件对象同时传1</button></p>
    <p><button onclick="f1(1,event)">自定义参数和事件对象同时传2</button></p>
    <p><button onclick="f2(this)">实参this,指向当前按钮</button></p>
    <hr/>
    <input type="text" name="" id="" oninput="f3(event)">
    <hr/>
    <input type="text" name="" id="" onchange="f4(event)">
    <script>
        // let oBtn = document.querySelector('button');
        // oBtn.onclick = function(){

        // }
        // fn是click事件的事件回调函数
        /**
         * 1. fn 是谁调用的,this!  事件回调的函数的调用者是 window
         * 2. 事件对象: 调用是传递实参event
         * 3. 阻止默认行为:e.preventDefault();
         *
         */
        function fn(e){
            console.log('this: ', this);
            console.log('e: ', e);
            e.preventDefault();
        }
        function f1(a,b){
            console.log('a: ', a);
            console.log('b: ',b);
        }

        function f2(_this){
            console.log('_this: ', _this);// 指向当前按钮
            console.log(this);// window 调用者是window
        }


        function f3(e){
            //oninput 触发时机,有输入就触发
            console.log('oninput value: ',e.target.value)
            console.log('oninput e: ', e);//InputEvent
        }

        function f4(e){
            // onchange 内容有变化,并且失去交点触发
            console.log('onchange value: ',e.target.value)
            console.log('onchange e: ', e);//Event
        }

    </script>
</body>
2
3
4
5
6
7
8
9
10
11
12
13
14
15
16
17
18
19
20
21
22
23
24
25
26
27
28
29
30
31
32
33
34
35
36
37
38
39
40
41
42
43
44
45
46
47
48
49
50
51
52
53
# 9-2. jsx中的事件
绑定事件的语法:【通过标签属性的方式绑定】
<button onClick={函数名}>click</button>事件回调函数研究:
this指向问题:react的事件回调函数的调用者是window,所以this指向window,因为react使用的是严格模式,所以,this指向undefined
事件对象:
- react的事件对象默认可以通过第一个形参进行接收
- react的事件对象是一个经过react处理后的事件对象,原生的事件对象的常用属性都有,并且做了兼容性处理
- 如果想获取原生的事件对象,可以通过nativeEvent 属性获取
- 通过
e.preventDefault()阻止默认行为事件回调函数传递参数
包裹箭头函数:
<button onClick={()=>click(1,2)}>参数</button>即传递参数又传递事件对象:
<button onClick={(e)=>click(e,1,2)}>参数事件对象同时传递</button>jsx中的 onChange事件实际是原生的 oninput事件
- 触发时机是键盘输入就触发
- 事件对象是 InputEvent
- 事件回调函数的绑定及调用
<!DOCTYPE html>
<html lang="en">

<head>
    <meta charset="UTF-8">
    <title>Title</title>
    <script src="./lib/react.development.js"></script>
    <script src="./lib/react-dom.development.js"></script>
    <script src="./lib/babel.min.js"></script>
</head>

<body>
    <div id="root"></div>
</body>
<script type="text/babel">
    /**
     * 在标签属性上通过 on事件名=事件回调函数 进行绑定
     * 1. 事件名首字母大写
     * 2. 事件回调函数填的是函数名[函数的定义、函数的引用地址],而不是函数的调用
     *
     * -----------
     * this指向问题:undefined 说明 react中的事件回调的调用者也是window,严格模式所以是undefined
     *
     * 事件对象e:
     * 1. 一个经过react包装后的事件对象,原生的事件对象常用属性,基本都有。这个事件对象更好用,已经做过兼容性处理了
     * 2. 如果想获取原生的事件对象:e.nativeEvent
     * 3. 事件的回调函数是window帮我们调用的,会默认的将事件对象作为第一个实参传递给我
     *
     * 事件回调函数参数的传递
     * 包裹一个箭头函数,在箭头函数内部调用函数并传递参数
     */
    const root = ReactDOM.createRoot(document.querySelector("#root"));

    function click1() {
        console.log('click1');
        console.log('this: ', this);//undefined
    }

    function click2(e) {
        console.log(e);
        e.preventDefault();
    }

    function click3(a, b) {
        console.log('click3');
        console.log('a: ', a);
        console.log('b: ', b);
    }

    function outFn() {
        click3(1, 2);
    }

    function click4(e, a, b) {
        console.log('e: ', e);
        console.log('a: ', a);
        console.log('b: ', b);
        e.preventDefault();
    }

    /**
     * react中的 onChange事件,实际是原生的 oninput事件
     */
    function change(e){
        console.log('change e: ', e);
        console.log('value: ', e.target.value);
    }
    root.render((
        <div>
            <p><button onClick={click1}>click1</button></p>
            <p><a href="http://baidu.com" onClick={click2}>百度</a></p>

            <h3>事件回调函数传参</h3>
            <p><button onClick={click3()}>click3</button></p>
            <p><button onClick={outFn}>传递参数</button></p>
            <p><button onClick={function () {
                click3(2, 3);
            }}>包裹匿名函数传递参数</button></p>
            <p><button onClick={() => click3(2, 3)}>包裹箭头函数传参</button></p>
            <h3>即传递参数,又同时传递事件对象</h3>
            <p><button onClick={(e) => {
                console.log('e: ', e);
                click3(1, e);
            }}>即传递参数,又同时传递事件对象</button></p>

            <p><a href="http://baidu.com" onClick={(e) => click4(e, 100, 222)}>百度</a></p>

            <hr/>
            <input type="text" onChange={change} name="" id=""/>
        </div>
    ))
</script>

</html>
2
3
4
5
6
7
8
9
10
11
12
13
14
15
16
17
18
19
20
21
22
23
24
25
26
27
28
29
30
31
32
33
34
35
36
37
38
39
40
41
42
43
44
45
46
47
48
49
50
51
52
53
54
55
56
57
58
59
60
61
62
63
64
65
66
67
68
69
70
71
72
73
74
75
76
77
78
79
80
81
82
83
84
85
86
87
88
89
90
91
92
93
94
# 10. jsx中的注释
jsx中的注释:
单行注释:
{// }多行注释:
{/* */}行内属性注释:
/* */
const root = ReactDOM.createRoot(document.querySelector("#root"));
root.render((
    <div>
        { //单行注释,最少得两行
        }

        {/*多行注释*/}
        {/*
            多行注释
            123123
            123123
            123123
        */}
        <div id='box' /* className='wrapper' */>我是div</div>
    </div>
))
2
3
4
5
6
7
8
9
10
11
12
13
14
15
16
# 11. 文档碎片
React.Fragment
解决了react中必须有唯一根节点,导致标签结构多一层嵌套的问题
用法有三种
const root = ReactDOM.createRoot(document.querySelector("#root"));
const { Fragment } = React;
root.render((
    // 用法一
    /*
    <React.Fragment>
        <div>1111</div>
        <div>2222</div>
    </React.Fragment>
    */

    // 用法二
    /*
    <Fragment>
        <div>1111</div>
        <div>2222</div>
    </Fragment>
    */
    // 用法三
    <>
        <div>1111</div>
        <div>2222</div>
    </>
))
2
3
4
5
6
7
8
9
10
11
12
13
14
15
16
17
18
19
20
21
22
23
24
# 12. 组件初识
组件:组成整体的一个部件,简称组件
react中的组件:
<font color='red'> jsx (html结构 + js 逻辑) + css</font> + 静态资源【图片、视频、字体】创建一个组件:react中的组件有两种
- 类组件[16.4版本以前]:
- 函数组件[18.xx]:
# 12-1. 类组件
定义类组件
- 本质就是一个类,使用class关键字定义
- 类名首字母必须大写,类名就是组件名
- 类组件必须继承 React.Component类
- 类组件中必须有render方法
- render方法中必须 [99.99%] 返回 react元素【jsx】
调用类组件:使用 jsx 语法进行调用
- 单标签调用: <组件名/>
- 对标签调用: <组件名></组件名>
调用过程:
- 发现首字母大写的jsx调用标签,会将其当做组件处理
- 查找是否定义了该组件,如果定义了并且发现是类组件,那么render函数会帮咱们实例化该类,并用实例化出来的对象,调用render方法
- 将render方法执行后的返回值,替换掉组件标签调用的位置
注意:类组件中的render方法,中的this,永远指向该类组件的实例对象
const root = ReactDOM.createRoot(document.querySelector("#root"));

// 定义Header类组件
class Header extends React.Component{
    render(){
        // 类组件render方法,永远是当前类组件的实例对象调用的
        console.log('header render this: ' ,this);
        return (
            <div className="header">我是头部</div>
        )
    }
}
class Main extends React.Component{
    render(){
        return (
            <div className="main">我是内容</div>
        )
    }
}
class Footer extends React.Component{
    render(){
        return (
            <div className="footer">我是底部</div>
        )
    }
}
root.render((
    <>
        <Header></Header>
        <Header/>
        <Main></Main>
        <Footer></Footer>
    </>
))
2
3
4
5
6
7
8
9
10
11
12
13
14
15
16
17
18
19
20
21
22
23
24
25
26
27
28
29
30
31
32
33
34
# 12-1-1. 自定义render函数模拟类组件调用渲染过程
<!DOCTYPE html>
<html lang="en">
<head>
    <meta charset="UTF-8">
    <title>Title</title>
    <!-- 获得React对象 -->
    <script src="./lib/react.development.js"></script>
    <script src="./lib/react-dom.development.js"></script>
    <script src="./lib/babel.min.js"></script>
</head>
<body>
    <div id="root"></div>
</body>
<script type="text/babel">
    const root = ReactDOM.createRoot(document.querySelector("#root"));
    const {Component} = React;
    // 类组件header
    class Header extends Component{
        render(){
            return (
                <div>我是Header</div>
            )
        }
    }
    // root.render(<Header/>)

    function render(reactComponent, root){
        console.log('reactComponent: ', reactComponent);// react元素对象
        console.log('root: ', root);
        console.log('reactComponent.type: ', reactComponent.type);// Header类
        // 实例化Header类
        const instance = new reactComponent.type();
        // 使用实例化对象调用 render方法
        const vdom = instance.render();
        console.log('vdom: ', vdom);//
        // 通过vdom 创建 真实dom
        const realDom = document.createElement(vdom.type);
        // 给真实dom添加内容
        realDom.innerHTML = vdom.props.children;
        // 将真实dom添加到页面,完成渲染
        root.appendChild(realDom);
    }
    let oRoot = document.querySelector('#root');
    render(<Header/>, oRoot);
</script>
</html>
2
3
4
5
6
7
8
9
10
11
12
13
14
15
16
17
18
19
20
21
22
23
24
25
26
27
28
29
30
31
32
33
34
35
36
37
38
39
40
41
42
43
44
45
46
# 12-2. 函数组件
函数组件的定义:
- 函数组件本质就是一个函数
- 函数名就是组件名,函数名首字母必须大写
- 函数中必须有return 语句,并且返回react元素
函数组件的调用:jsx调用
- 单标签调用:
<组件名/>- 对标签调用:
<组件名></组件名>调用过程:
- 首先jsx 有首字母大写的标签,会当做组件处理,查找该组件的定义
- 如果找到了并且发现是函数组件,那么render方法会帮咱们调用函数组件
- 将函数调用的返回值 [react元素],替换掉组件调用标签的位置
- 函数组件的定义及调用
const root = ReactDOM.createRoot(document.querySelector("#root"));
function Header(){
    console.log('Header run');
    console.log('Header this: ', this);// 函数组件中this 指向undefined
    return (
        <div>我是Header组件</div>
    )
}
function Main(){
    return (
        <div>我是Main组件</div>
    )
}
function Footer(){
    return (
        <div>我是Footer组件</div>
    )
}
root.render((
    <>
        <Header></Header>
        <Header/>
        <Main/>
        <Footer/>
    </>
))
2
3
4
5
6
7
8
9
10
11
12
13
14
15
16
17
18
19
20
21
22
23
24
25
26
# 12-2-1. 自定义render模拟函数组件调用渲染过程
函数组件中的this,指向undefined
const root = ReactDOM.createRoot(document.querySelector("#root"));
// root.render((
//     <div></div>
// ))
function Header(){
    return (
        <div>我是Header组件</div>
    )
}

function render(reactComponent, root){
    console.log('reactComponent: ', reactComponent);// react元素
    console.log('reactComponent.type',reactComponent.type);// Header组件函数
    // 调用函数
    const vdom = reactComponent.type(); // vdom 是Header组件调用的返回值【react元素】
    console.log('vdom: ', vdom);
    // 创建真实dom
    const realDom = document.createElement(vdom.type);
    // 添加内容
    realDom.innerHTML = vdom.props.children;
    // 将真实dom渲染到根节点
    root.appendChild(realDom);
}

const oRoot = document.querySelector('#root');
render(<Header/>, oRoot);
2
3
4
5
6
7
8
9
10
11
12
13
14
15
16
17
18
19
20
21
22
23
24
25
26
# 13. react脚手架构建工程化开发环境
# 13-1. 全局安装脚手架并创建项目
create-react-app 脚手架的作用:帮你快速的构建一个工程化的开发react的环境
- 全局安装脚手架
# npm
npm i create-react-app -g
# yarn
yarn add global create-react-app
2
3
4
- 使用create-react-app 命令 创建react项目
# npm
create-react-app 项目名 # 注意项目名不能叫 react
# yarn
yarn create react-app 项目名
# 项目名不能有中文
2
3
4
5
- 运行项目
# cd 项目目录
cd 项目目录
# npm
npm start
# yarn
yarn start
2
3
4
5
6
# 13-2. 局部安装方法
找一个目录【不能是中文】,打开终端
npm init -y
局部安装 create-react-app
npm i create-react-app通过局部命令创建项目
npx create-react-app 项目名进入项目目录并启动项目
cd 项目名
npm start
1
2
# 13-3. react工程化项目目录结构分析
02-react-scaffold                          项目根目录
    |- node_modules                        npm包目录
    |— public                              静态资源目录
    |    |- favicon.ico                    站点图标
    |    |- index.html                     网站的入口html文件
    |    |- logo192.png                    移动端图片
    |    |- logo512.png                    移动端图片
    |    |- manifest.json                  移动端图标的配置文件
    |    |- robots.txt                     爬虫文件
    |- src                                 程序员开发目录
    |   |- App.css                         根组件的样式文件
    |   |- App.js                          根组件App
    |   |- App.test.js                     测试文件
    |   |- index.js                        js的入口文件
    |   |- index.css                       入口文件的样式文件
    |   |- logo.svg                        旋转的菊花图标
    |   |- reportWebVitals.js              google的报告文件
    |   |- setupTests.js                   测试启动文件
    |- package-lock.json                   包版本锁文件
    |- package.json                        包配置文件
2
3
4
5
6
7
8
9
10
11
12
13
14
15
16
17
18
19
20
# 13-4. 项目目录精简
# 13-4-1. 最常见的模块化错误

can't resolve xxxx 不能够解析 xxx文件 ===》找不到 xxx文件
同学常犯错误:
- 文件名写错了或者是目录写错完了
- 不存在这个目录或者是文件
# 13-4-2. 精简后目录结构及文件
src
  |- index.js
  |- App.js
public
  |- index.html
  |- favicon.ico
2
3
4
5
6
- index.js
import React from 'react';
import ReactDOM from 'react-dom/client';
// 导入App根组件
import App from './App';
const root = ReactDOM.createRoot(document.getElementById('root'));
root.render(
    <App />
);
2
3
4
5
6
7
8
- App.js
function App() {
    return (
        <div>App</div>
    );
}
export default App;
2
3
4
5
6
- public/index.html
<!DOCTYPE html>
<html lang="en">
  <head>
    <meta charset="utf-8" />
    <link rel="icon" href="%PUBLIC_URL%/favicon.ico" />
    <meta name="viewport" content="width=device-width, initial-scale=1" />
    <meta name="theme-color" content="#000000" />
    <meta
      name="description"
      content="Web site created using create-react-app"
    />
    <title>React App</title>
  </head>
  <body>
    <div id="root"></div>
  </body>
</html>
2
3
4
5
6
7
8
9
10
11
12
13
14
15
16
17
# 13-4-3. 快速创建组件命令
rcc: react class component 快速创建类组件
rfc: react function component 快速创建函数组件
# 13-5. 类组件
# 13-5-1. 类组件可以定义状态 state [状态数据]
类组件定义状态数据的方式,就是添加一个特殊名的属性 state [状态只能定义在state属性上,state是专有特殊的属性]
定义状态的两种方式:
- 在构造函数中定义:
- 直接赋值定义:
读取状态:
- 通过this.state读取
- 解构成变量后,读取
状态的改变:
this.setState({
    count:this.state.count + 3
})
setState调用后:
1. 修改状态
2. 触发render函数重新调用
1
2
3
4
5
6注意:父组件重新render,那么子组件也会无条件重新渲染[类-render、函数组件-函数被重新调用]
- 在构造函数中定义状态
// 定义状态的方式一:
constructor(){
    super();// 调用父类的构造函数
    // 定义自己的属性 state, 就是类组件的状态数据
    this.state = {
       count:100,
       msg:'atguigu'
    }
}
2
3
4
5
6
7
8
9
- 直接赋值定义
// 定义状态的方式二:
state = {
    count:99,
    msg:'atguigu123'
}
2
3
4
5
读取状态:
- 通过this.state读取
- 解构成变量后读取
render() {
    console.log(this);// render函数是类的实例对象调用的,永远指向当前实例对象
    // 解构使用
    let {count,msg} = this.state;
    return (
        <div>
            <p>count : {this.state.count}-{count}</p>
            <p>msg: {this.state.msg}-{msg}</p>
        </div>
    )
}
2
3
4
5
6
7
8
9
10
11
- 修改状态
import React, { Component } from 'react'
/**
 * 状态数据研究三个方向:
 * 1. 如何定义状态
 * 2. 如何读取状态
 * 3. 如何修改状态
 */
export default class App extends Component {
    state = {
        count:99,
        msg:'atguigu123'
    }
    addCount(num){
        /**
         *  直接赋值改变状态数据
         *  问题: 可以改变状态数据,但是不会触发组件重新渲染
         */

        // this.state.count += num;
        // console.log('count: ',this.state.count);

        /**
         * this.setState()
         * 1. 将状态数据的值改变
         * 2. 触发render重新调用
         */
        this.setState({
            count: this.state.count + num
        })
    }

    changeMsg(){
        this.setState({
            // msg: 'atguigu123123123123123212'
            msg:this.state.msg + '!'
        })
    }
    render() {
        console.log('render run');
        let {count,msg} = this.state;
        return (
            <div>
                <p>count : {this.state.count}-{count}</p>
                <p>msg: {this.state.msg}-{msg}</p>
                <p><button onClick={()=>this.addCount(3)}>count++ </button></p>

                <p><button onClick={()=>this.changeMsg()}>msg + !</button></p>
            </div>
        )
    }
}
2
3
4
5
6
7
8
9
10
11
12
13
14
15
16
17
18
19
20
21
22
23
24
25
26
27
28
29
30
31
32
33
34
35
36
37
38
39
40
41
42
43
44
45
46
47
48
49
50
51
52
# 13-5-2. 类组件事件回调this指向问题
因为react的事件回调函数的调用者是window,所以定义成普通函数的事件回调中的this在严格模式下值是undefined。我们希望事件回调中的this可以指向当前组件的实例,实现方式有如下几种:
- 通过bind
- 包裹箭头函数
- bind结合constructor
- 直接定义成箭头函数【不推荐】
import React, { Component } from 'react'
/**
 * 状态数据研究三个方向:
 * 1. 如何定义状态
 * 2. 如何读取状态
 * 3. 如何修改状态
 */
export default class App extends Component {
    state = {
        count:99,
        msg:'atguigu123'
    }
    click1(){
        console.log('click1 this: ', this); // 事件的回调是window调用的,所以是undefined
    }

    click2(){
        // bind作用: 改变函数的this指向,返回一个新的函数
        console.log('click2 this: ', this);
    }

    click3(){
        // 包裹箭头函数,使用外部作用域 render中的this
        console.log('click3 this: ', this);
    }

    click4 = ()=>{
        // 使用的是constructor中的this
        console.log('click4 this: ', this);
    }

    click5(){
        console.log('click5 this: ', this);
    }

    constructor(){
        super();
        // bind 配合constructor 实现改变click5this指向当前实例
        this.click5 = this.click5.bind(this);
    }

    /**
     * 原则:
     * 1. 是否可以传参        bind 包裹箭头函数
     * 2. 是否占用内存空间    bind 包裹箭头函数
     *
     */
    render() {
        console.log(this);// render函数是类的实例对象调用的,永远指向当前实例对象
        // 解构使用
        let {count,msg} = this.state;
        return (
            <div>
                <p>count : {this.state.count}-{count}</p>
                <p>msg: {this.state.msg}-{msg}</p>
                <p><button onClick={this.click1}>count++ 有问题的</button></p>

                <p><button onClick={this.click2.bind(this)}>通过bind修改 count++ </button></p>
                <p><button onClick={()=>this.click3()}>包裹箭头函数</button></p>

                <p><button onClick={this.click4}>直接定义成箭头函数</button></p>

                <p><button onClick={this.click5}>bind结合构造函数</button></p>
            </div>
        )
    }
}
2
3
4
5
6
7
8
9
10
11
12
13
14
15
16
17
18
19
20
21
22
23
24
25
26
27
28
29
30
31
32
33
34
35
36
37
38
39
40
41
42
43
44
45
46
47
48
49
50
51
52
53
54
55
56
57
58
59
60
61
62
63
64
65
66
67
68
# 13-5-3. 外部数据 props
组件间通信的借助props传递
父组件向子组件传递数据:
父组件如何传递数据给子组件?
- 通过子组件调用标签属性的方式传递
子组件如何接收父组件传递的数据?
类子组件通过 this.props属性接收
函数子组件通过函数的形参接收【一般会直接在参数位置解构】
子组件向父组件传递数据,也是借助props
- 在父组件定义一个方法,方法设置一个或多个形参
- 将该方法改变this指向,让this指向当前组件的实例对象
- 将该方法通过标签数据性的方式传递给子组件
- 在子组件中通过 props接收
- 类组件: this.props.方法名
- 函数组件: props.方法名
- 在子组件中调用该方法,并将要传递的数据以实参的方式传递
注意:
<font color='red'>props外部数据是只读的,在子组件中不可以直接修改</font>- props的children属性,可以接收到组件调用对标签中的子元素
# 13-5-3-1. 类的子组件通过this.props接收
通过固定属性 this.props接收外部数据
- 父组件 App
import React, { Component } from 'react'
import ClassCom from './components/ClassCom';
import FunCom from './components/FunCom';
/**
 * 状态数据研究三个方向:
 * 1. 如何定义状态
 * 2. 如何读取状态
 * 3. 如何修改状态
 */
export default class App extends Component {
    state = {
        count:99,
        msg:'atguigu123'
    }
    addCount(num){

        this.setState({
            count: this.state.count + num
        })
    }

    changeMsg(){
        this.setState({
            // msg: 'atguigu123123123123123212'
            msg:this.state.msg + '!'
        })
    }

    render() {
        console.log('render run');
        let {count,msg} = this.state;
        return (
            <div>
                <p>count : {this.state.count}-{count}</p>
                <p>msg: {this.state.msg}-{msg}</p>
                <p><button onClick={()=>this.addCount(3)}>count++ </button></p>
                <p><button onClick={()=>this.changeMsg()}>msg + !</button></p>
                <hr/>
                {/* 父组件通过子组件标签属性传递数据给子组件 */}
                {/* <ClassCom num={count} xiaoxi={msg} school='尚硅谷'/> */}
                <ClassCom count={count} msg={msg} school='尚硅谷'/>
                <FunCom/>
            </div>
        )
    }
}
2
3
4
5
6
7
8
9
10
11
12
13
14
15
16
17
18
19
20
21
22
23
24
25
26
27
28
29
30
31
32
33
34
35
36
37
38
39
40
41
42
43
44
45
46
- 子组件
import React, { Component } from 'react'

export default class ClassCom extends Component {
    render() {
        // 子组件通过特殊属性 this.props进行接收
        console.log('classCom render');
        console.log('this.props: ', this.props);

        // 解构后使用
        let {count, msg, school} = this.props
        return (
            <div>
                <h3>ClassCom</h3>
                <p>props count: {this.props.count}-{count}</p>
                <p>props msg: {this.props.msg}-{msg}</p>
                <p>props school: {this.props.school}-{school}</p>
            </div>
        )
    }
}
2
3
4
5
6
7
8
9
10
11
12
13
14
15
16
17
18
19
20
# 13-5-3-2. 函数子组件通过 形参接收
函数子组件也可以接收外部数据,通过函数组件的形参接收
import React from 'react'
// 直接在参数位置解构props对象中的数据
export default function FunCom({count, msg ,school}) {
    console.log('FunCom run');

    return (
        <div>
            <h3>FunCom</h3>
            <p>props count: {count}</p>
            <p>props msg: {msg}</p>
            <p>props school: {school}</p>
        </div>
    )
}

// export default function FunCom(props) {
//     console.log('FunCom run');
//     console.log('props: ', props);
//     let {count, msg ,school} = props
//     return (
//         <div>
//             <h3>FunCom</h3>
//             <p>props count: {props.count}-{count}</p>
//             <p>props msg: {props.msg}-{msg}</p>
//             <p>props school: {props.school}-{school}</p>
//         </div>
//     )
// }
2
3
4
5
6
7
8
9
10
11
12
13
14
15
16
17
18
19
20
21
22
23
24
25
26
27
28
29
30
# 13-5-3-3. 组件通信-子传父
- 父组件定义方法
- 通过 子组件标签属性将方法传递给子组件[注意要改变该方法的this指向]
- 子组件通过props接收
- 子组件调用方法并将数据以实参的形式传递
- 父组件App.jsx
import React, { Component } from 'react'
import ClassCom from './components/ClassCom';
import FunCom from './components/FunCom';
/**
 * 状态数据研究三个方向:
 * 1. 如何定义状态
 * 2. 如何读取状态
 * 3. 如何修改状态
 */
export default class App extends Component {
    state = {
        count:99,
        msg:'atguigu123'
    }
    addCount(num){

        this.setState({
            count: this.state.count + num
        })
    }

    changeMsg(){
        this.setState({
            // msg: 'atguigu123123123123123212'
            msg:this.state.msg + '!'
        })
    }

    // 1. 定义一个方法
    decCount(num){
        this.setState({
            count:this.state.count - num
        })
    }

    render() {
        console.log('render run');
        let {count,msg} = this.state;
        return (
            <div>
                <p>count : {this.state.count}-{count}</p>
                <p>msg: {this.state.msg}-{msg}</p>
                <p><button onClick={()=>this.addCount(3)}>count++ </button></p>
                <p><button onClick={()=>this.changeMsg()}>msg + !</button></p>
                <hr/>
                {/* 将decCount this指向改变为当前实例对象后传递给子组件 */}
                <ClassCom count={count} msg={msg} school='尚硅谷' decCount={this.decCount.bind(this)}/>
                {/* 函数子组件也是通过属性传递数据 */}
                <FunCom  count={count} msg={msg} school='尚硅谷' decCount={this.decCount.bind(this)}/>
            </div>
        )
    }
}
2
3
4
5
6
7
8
9
10
11
12
13
14
15
16
17
18
19
20
21
22
23
24
25
26
27
28
29
30
31
32
33
34
35
36
37
38
39
40
41
42
43
44
45
46
47
48
49
50
51
52
53
54
- 类的子组件
render() {
    // 子组件通过特殊属性 this.props进行接收
    console.log('classCom render');
    console.log('this.props: ', this.props);

    // 解构后使用
    let {count, msg, school,decCount} = this.props
    return (
        <div>
            <h3>ClassCom</h3>
            <p>props count: {this.props.count}-{count}</p>
            <p>props msg: {this.props.msg}-{msg}</p>
            <p>props school: {this.props.school}-{school}</p>

            <p><button onClick={()=>{
                // props数据是只读的,不可修改
                this.props.count = 10000;
            }}>修改props 中的 count</button></p>

            <p><button onClick={()=>{
                decCount(5);
            }}>子传父</button></p>
        </div>
    )
}
2
3
4
5
6
7
8
9
10
11
12
13
14
15
16
17
18
19
20
21
22
23
24
25
- 函数子组件
import React from 'react'
// 直接在参数位置解构props对象中的数据            接收方法 decCount
export default function FunCom({count, msg ,school,decCount}) {
    console.log('FunCom run');

    return (
        <div>
            <h3>FunCom</h3>
            <p>props count: {count}</p>
            <p>props msg: {msg}</p>
            <p>props school: {school}</p>
            <p><button onClick={()=>{
                // 调用方法,并传递参数
                decCount(7);
            }}>子传父</button></p>
        </div>
    )
}
2
3
4
5
6
7
8
9
10
11
12
13
14
15
16
17
18
# 13-5-3-4. props.children
作用:当组件进行对标签调用的时候,可以获取对标签中的子元素
- App.jsx
import React, { Component } from 'react'
import Button from './components/Button'
export default class App extends Component {
    render() {
        return (
            <div>
                <Button/>
                <Button>保存</Button>
                <Button>取消</Button>
                <Button>提交</Button>
            </div>
        )
    }
}
2
3
4
5
6
7
8
9
10
11
12
13
14
- Button.jsx
import React, { Component } from 'react'
export default class Button extends Component {
    render() {
        let {children} = this.props; // 获取对标签调用的子元素
        return (
            <button>{children}</button>
        )
    }
}
2
3
4
5
6
7
8
9
# 13-5-3-5. 限定props数据类型-默认值-必填
import PropTypes from 'prop-types'使用prop-types 包,对传入的外部数据进行类型、必填、默认值的限定
- 类组件是通过定义静态属性的方式实现
static propTypes = {
    name:PropTypes.string.isRequired, // name是字符串,且必须传
    age:PropTypes.number // age 是数字,可以不传
}

static defaultProps = {
    age:100 // 限定默认值
}
1
2
3
4
5
6
7
8
- 函数组件通过给函数对象添加属性的方式实现
TestFun.propTypes = {
    name: PropTypes.string.isRequired,
    age: PropTypes.number
}

TestFun.defaultProps = {
    age: 10000
}
1
2
3
4
5
6
7
8
# 13-5-4. 组件目录结构
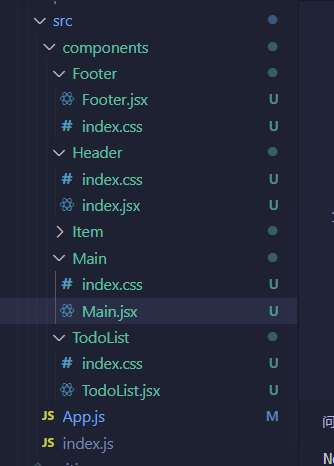
# 13-5-4-1. todolist静态页面拆分
- 创建components目录
- 创建 TodoList、Header、Main、Item、Footer目录
- 创建组件[jsx]及css文件
- 在各个组件中导入 css样式 import './index.css'
- 将todolist静态页面的整体结构拷贝到 TodoList/Todolist.jsx的结构中
- 将样式拷贝到 TodoList/index.css中
- 将TodoList.jsx中的 class ===> className
- 将TodoList.jsx中的 结构 拆分到各个组件中
- 将TodoList/index.css 的样式,拆分到各个组件中
# 13-6. css样式文件处理
第三方的css样式库: bootstrap.css
方式一:
位置:public/css/bootstrap.css
引入方式:public/index.html 通过 link标签引入
方式二:
- 安装样式库:
npm i bootstrap@3- 使用import 语法导入样式:src/index.js 使用import
重置样式:
位置:src/index.css
引入: src/index.js 通过 import 导入
全局通用样式
位置:src/App.css
引入:src/App.jsx 通过 import 导入
组件内样式
位置:组件目录的css中
导入:组件中使用import 导入
css模块化:将css文件变为 js模块进行处理
作用:解决组件同类名的样式冲突问题
步骤:
css文件名:必须以 文件名
<font color='red'>.module.css</font>后缀结尾使用import 语法导入css模块并存储成 js变量
#例如:
import styles from './index.module.css'
console.log('styles: ', styles); // {box: 'B_box__-Qmig'}
1
2
3使用插值表达式给className赋值,之为 styles中的类名
import React, { Component } from 'react'
// 2 导入css模块并存储成js变量
import styles from './index.module.css'
console.log('styles: ', styles);
export default class B extends Component {
    render() {
        return (
            <>
            	<div className={styles.box}>B</div>
            	<div className={[styles.box, styles.app, 'container'].join(' ')}>B多个类名</div>
            </>
        )
    }
}
1
2
3
4
5
6
7
8
9
10
11
12
13
14
# 13-7. 图片处理
网络图片:
直接填入网络地址即可
本地图片:
<font color='red'>前提:存放位置必须在src目录中</font>2-1. 使用 import 导入
import imgSrc from './assets/images/1.jpeg'

<img src={imgSrc} alt="" />
1
2
32-2. 使用require导入
state = {
    index:2
}
<img src={require(`./assets/images/${index}.jpeg`)} alt="" />
1
2
3
4import 导入和 require导入图片的差别:require导入可以看到图片的路径,可以通过状态数据控制导入的图片目录
import导入的图片路径是写死的,不能控制
# 13-8. 类组件的生命周期
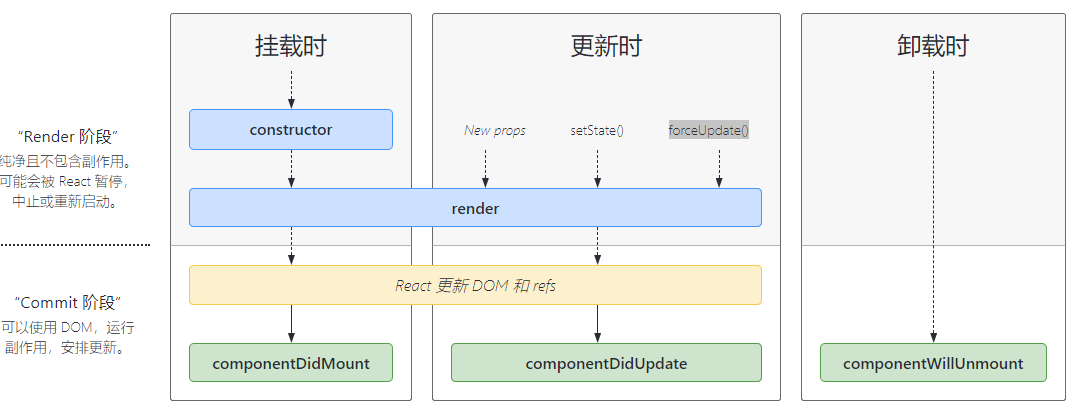
挂载阶段:执行顺序 constructor --> render --->componentDidMount
componentDidMount: 执行时机,组件挂载完成后执行
作用:
- 开启定时器
- 发送ajax请求
- 订阅消息
- 添加自定义事件
# 13-8-1. componentDidMount
import React, { Component } from 'react'

export default class App extends Component {

    constructor() {
        super();
        console.log('App constructor');
    }
    render() {
        console.log('App render');
        return (
            <div>App</div>
        )
    }
    /**
     * component : 组件
     * Did: do 过去式 完成
     * Mount: 挂载
     * componentDidMount 组件完成挂载之后执行, jsx已经渲染成真实dom出现在页面中了
     *
     * 作用:
     * 1. 开启定时器
     * 2. 发送ajax请求  axios
     * 3. 订阅消息
     * 4. 添加自定义事件
     *
     *
     * 注意:constructor 和 componentDidMount 只执行一次
     */
    componentDidMount() {
        console.log('App componentDidMount');

    }
}
2
3
4
5
6
7
8
9
10
11
12
13
14
15
16
17
18
19
20
21
22
23
24
25
26
27
28
29
30
31
32
33
34
# 13-8-1-1. 电子时钟案例练习
import React, { Component } from 'react'
// 1. 安装moment npm i moment
// 2. 导入moment
import moment from 'moment'
export default class App extends Component {
    state = {
        nowDate: moment().format('YYYY-MM-DD HH:mm:ss')
    }
    constructor() {
        super();
        console.log('App constructor');
    }
    render() {
        console.log('App render');
        let {nowDate} = this.state;
        return (
            <div>
                当前时间是: {nowDate}
            </div>
        )
    }
    componentDidMount() {
        // 生命周期函数都是react在特定时间节点调用的,所有生命周期函数中的this都指向当前组件的实例对象
        setInterval(()=>{
            this.setState({
                nowDate:moment().format('YYYY-MM-DD HH:mm:ss')
            })
        },1000)
    }
}
2
3
4
5
6
7
8
9
10
11
12
13
14
15
16
17
18
19
20
21
22
23
24
25
26
27
28
29
30
31
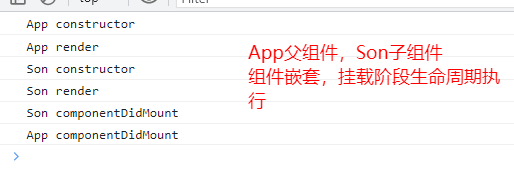
# 13-8-1-2. 父子组件嵌套挂载执行顺序
# 13-8-2. 组件更新阶段-componentDidUpdate
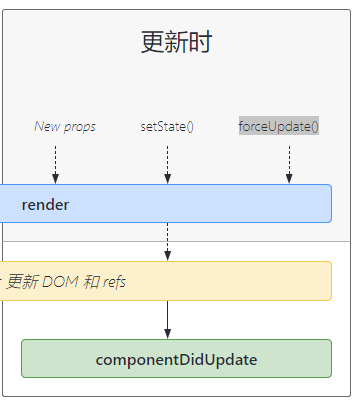
触发时机:
- new props: [父组件render,子组件无条件render]
- setState:
- forceUpdate
<font color='red'>只有以上三种情况会触发组件的 render重新调用,进而触发 componentDidUpdate的执行</font>componentDidUpdate作用:
- 发送ajax请求
- 可以更新本地存储的数据 localStorage sessionStorage
# 13-8-3. 组件卸载-componentWillUnmount
执行时机:组件卸载前执行
作用:
- 取消定时器
- 取消订阅消息
- 解绑自定义事件
- App父组件
import React, { Component } from 'react'
import Son from './components/Son'

export default class App extends Component {
    state = {
        count:1
    }
    render() {
        return (
            <div>
                <h3>App</h3>
                <p>state count: {this.state.count}</p>
                <p><button onClick={()=>{
                    this.setState({
                        count: this.state.count + 1
                    })
                }}>count++</button></p>

                <hr />
                {/*条件渲染,控制Son组件的挂载和卸载*/}
                {this.state.count % 2 === 0 && <Son/>}
            </div>
        )
    }
}
2
3
4
5
6
7
8
9
10
11
12
13
14
15
16
17
18
19
20
21
22
23
24
25
- Son.jsx
import React, { Component } from 'react'

export default class Son extends Component {
    constructor(){
        super();
        console.log('Son constructor');
    }
    componentDidMount(){
        console.log('Son ComponentDidMount')
    }
    /**
     * component组件
     * will 即将
     * unmount: 卸载
     * 组件即将卸载的之前执行:【临终遗言】
     * 作用:
     * 1. 关闭定时器
     * 2. 取消订阅
     * 3. 解绑自定义事件
     */
    componentWillUnmount(){
        console.log('Son componentWillUnmount')
    }
    render() {
        return (
            <div>Son</div>
        )
    }
}
2
3
4
5
6
7
8
9
10
11
12
13
14
15
16
17
18
19
20
21
22
23
24
25
26
27
28
29
30
# 13-9. ref
作用:在react项目中,获取真实dom元素
使用步骤:
- 创建一个ref对象: React.createRef()
- 给jsx元素,绑定ref属性
<input ref={ref对象}/>- 通过ref对象的current属性获取真实dom==>
ref对象.current
# 13-9-1. ref基本使用
import React, { Component,createRef } from 'react'

export default class App extends Component {
    // 1. 创建ref对象,并让其是类组件的私有属性
    inputRef = createRef();
    render() {
        console.log('inputRef: ',this.inputRef);// {current: null}
        return (
            <div>
                {/* 2. ref绑定要获取真实dom的jsx */}
                <input type="text" ref={this.inputRef}/>

                <p><button onClick={()=>{
                    // 获取input真实dom
                    console.log('this.inputRef: ',this.inputRef);
                    console.log('input value: ', this.inputRef.current.value)
                }}>获取 用户输入的 input 的内容</button></p>
            </div>
        )
    }
}
2
3
4
5
6
7
8
9
10
11
12
13
14
15
16
17
18
19
20
21
# 13-9-2. 受控组件[表单元素]
相对于表单元素而言的
什么是受控组件?
答:当给表单元素的value属性的值赋值为状态数据的时候,那么表单元素的值就收到了状态数据的控制,称为受控组件。
一旦受控,表单元素变为只读的,用户输入不可修改。如果想让用户可以输入,需要添加onChange事件,在事件回调中,获取用户最新的输入,用来给状态赋值。
type='text' :通过value进行受控
type='radio' : 通过 checked 进行受控
type='checkbox' : 通过 checked 进行受控
import React, { Component } from 'react'
/**
 * 受控组件:相对于表单元素来说的
 * 什么是受控组件:表单元素的值,受到组件状态数据的控制
 *
 */
export default class FormControl extends Component {
    state = {
        username: 'atguigu',
        password: '123123',
        sex: '0'
    }
    save(e) {
        // 阻止默认行为
        e.preventDefault();
        console.log('save')
        console.log('username: ', this.state.username);
        console.log('password: ', this.state.password);
    }
    // changeUsername(e){
    //     console.log('e.target.name: ', e.target.name);// 获取表单元素的name属性值
    //     this.setState({
    //         [e.target.name]: e.target.value
    //     })
    // }

    // changePassword(e){
    //     console.log('e.target.name: ', e.target.name);
    //     this.setState({
    //         [e.target.name]: e.target.value
    //     })
    // }

    // change
    change(e) {
        this.setState({
            [e.target.name]: e.target.value
        })
    }
    render() {
        let { username, password,sex } = this.state;
        return (
            <>
                <form action="" onSubmit={this.save.bind(this)}>
                    {/*
                        当把状态数据,赋值给表单的value属性,该表单元素受控
                        表单受控会有一下后果:
                        1. 表单的内容变成只读的了,不能修改了
                        2. 如果受控还想能够让用户输入新内容,需要给受控的表单添加 onChange 事件,在onChange的事件处理函数中,获取用户最新的输入,用用户最新的输入值,给状态赋值,即可解除只读属性
                        3. 组件受控,并通过onChange绑定状态,实现了状态数据和表单值的双向绑定
                    */}
                    <p>姓名: <input type="text" name="username" value={username} onChange={this.change.bind(this)} /></p>

                    <p>密码: <input type="text" name="password" value={password} onChange={this.change.bind(this)} /></p>

                    {/* 针对与 radio ,受控不是受value属性值的控制,而是受 checked属性值的控制 */}
                    <p>
                        性别: 男 <input type="radio" name="sex" value="1" checked={sex === '1'} onChange={this.change.bind(this)}/>
                        女 <input type="radio" name="sex" value="0" checked={sex==='0'} onChange={this.change.bind(this)}/>
                    </p>

                    <hr />
                    {/*
                        以下都是可以提交的按钮
                        当点击保存按钮的时候,会将表单数据,提交到 action执行的地址,如果没有action属性,或者action属性为空,那么默认提交到当前地址,会刷新页面
                        提交按钮,会触发 form表单的 onSubmit事件,如果想阻止默认行为,通过 onSubmit的事件处理函数中的事件对象,e.preventDefault()进行阻止
                     */}
                    <p><button type='submit'>保存</button></p>
                    <p><button >保存2</button></p>
                    <p><input type='submit' value='保存3' /></p>

                    {/* 以下是不能提交的 */}
                    <p><button type='button'>不能提交</button></p>
                </form>
            </>
        )
    }
}
2
3
4
5
6
7
8
9
10
11
12
13
14
15
16
17
18
19
20
21
22
23
24
25
26
27
28
29
30
31
32
33
34
35
36
37
38
39
40
41
42
43
44
45
46
47
48
49
50
51
52
53
54
55
56
57
58
59
60
61
62
63
64
65
66
67
68
69
70
71
72
73
74
75
76
77
78
79
# 13-9-3. 非受控组件[表单元素]
什么是非受控组件:表单元素的value或checked值,不受到状态数据的控制
将状态数据渲染到表单中,使用 defaultValue 、defaultChecked
获取用户最新的输入,通过ref对象获取
import React, { Component,createRef } from 'react'

export default class FormOutControl extends Component {
    state = {
        username:'尚硅谷',
        password:'123123',
        sex:'1'
    }
    // 1. 创建ref对象
    usernameRef = createRef()
    passwordRef = createRef()
    sexRef = [createRef(),createRef()]
    save(e){
        e.preventDefault();
        console.log('username: ', this.usernameRef.current.value);
        console.log('password: ', this.passwordRef.current.value);
        console.log(this.sexRef);// [{current:{checked:false,value:'1'}}, {current:{checked:true, value:'0'}}]
        console.log('sex: ', this.sexRef.find(item=>item.current.checked).current.value);

    }
    render() {
        let {username, password, sex} = this.state;
        return (
            <>
                <form action="" onSubmit={this.save.bind(this)}>

                    <p>姓名: <input type="text" ref={this.usernameRef} name="username" defaultValue={username} /></p>

                    <p>密码: <input type="text" ref={this.passwordRef} name="password" defaultValue={password} /></p>

                    <p>
                        性别: 男 <input type="radio" ref={this.sexRef[0]} name="sex" value="1" defaultChecked={sex === '1'}  />
                        女 <input type="radio" name="sex" ref={this.sexRef[1]} value="0" defaultChecked={sex === '0'}  />
                    </p>
                    <p><button type='submit'>保存</button></p>
                </form>
            </>
        )
    }
}
2
3
4
5
6
7
8
9
10
11
12
13
14
15
16
17
18
19
20
21
22
23
24
25
26
27
28
29
30
31
32
33
34
35
36
37
38
39
40
# 14. todolist类组件实现练习

核心目标:掌握组件化开发的思路
功能实现步骤:
静态页面搭建
- 组件拆分
首屏数据渲染
数据结构分析
let todos = [
    {
        id:xxx,
        title:'吃饭',
        isDone:true | false
    }
]
1
2
3
4
5
6
7分析数据应该定义在哪个组件身上
原则:
- 如果数据只在一个组件身上使用,那么就当以在该组件自己身上
- 如果数据在多个组件都需要使用,那么定义在他们共同的父级身上
[<font color='red'>状态提升</font>]实现用户交互功能
思路生成步骤:
描述你要做什么,产生了什么结果
文本框输入内容,按下回车,将内容添加到列表中
拆分步骤:
- 获取文本框输入内容
- 按下回车
- 将内容添加到列表中
给步骤匹配你能想到的技术点
获取文本框输入内容
- ref
- 受控组件
- e.target.value
按下回车
- 绑定事件-键盘事件 keyup keydown onKeyUp onKeyDown
将内容添加到列表中
子传父
# 14-1. 首屏数据渲染
生成一个不重复的id
方式一:使用nanoid 包
步骤:
- 安装:
npm i nanoid- 导入:
import {nanoid} from 'nanoid'- 使用:
nanoid()方式二: 自己模拟生成一个字母数字随机组合的字符串
0-9 26 = 36
Math.random().toString(36).slice(2)首屏数据渲染实现步骤及技术点
- 将todos 数据定义成 TodoList 组件的状态
- 将 todos数据 通过标签属性的方式传递给 Main组件和 Footer组件
- 在Main组件中接收todos,并使用map进行列表渲染,定义key值,并将遍历的每一项 todo传递给 Item组件
- 在Footer组件中接收todos,计算total 和 doneNum后进行渲染
# 14-2. 添加todo
思路生成步骤:
描述你要做什么,产生了什么结果
文本框输入内容,按下回车,将内容添加到列表中
拆分步骤:
- 获取文本框输入内容
- 按下回车
- 将内容添加到列表中
给步骤匹配你能想到的技术点
获取文本框输入内容
- ref
- 受控组件
- e.target.value
按下回车
- 绑定事件-键盘事件 keyup keydown onKeyUp onKeyDown
将内容添加到列表中
子传父
# 14-3. 删除todo
描述:点击删除按钮,删除列表中的当前行
步骤:
- 点击删除按钮
- 删除该行
技术点:
点击删除按钮: onClick 传递 id
删除该行: 子传父
数据在谁身上,方法就要定义在谁身上
# 14-3. 切换完成状态
- 点击复选框,改变完成状态
- 步骤:
- 点击复选框[复选框发生变化,触发一个事件]
- 改变该条的完成状态
- 技术:
- 点击复选框[复选框发生变化,触发一个事件] onChange
- 改变该条的完成状态, 子传父
# 14-4. localStorage
本地存储
- 存储:localStorage.setItem(key,value)
- 读数据: localStorage.getItem(key)
- 删除: localStorage.removeItem(key)
- 全部删除: localStorage.clear()
注意:本地存储,存储的数据只能存基本数据类型,存不了对象和数组
想存对象和数组怎么办?
JSON.stringify 将对象或数组转化为 json格式的字符串
读取数据:
JSON.parse(JSON格式字符串)===》 JSON格式字符串还原成 对象或数组
# 15. 类组件小结
类组件的定义
类组件的状态数据-state
2-1. 状态数据的定义
2-2. 状态数据的读取
2-3. setState 状态数据的设置
类组件的外部数据-props
3-1. 子传父:
3-2. 父传子
3-3. props是只读的
3-4. children
3-5. 类型-必填-默认值限定
类组件生命周期
4-1. 挂载阶段: componentDidMount
    1. 开启定时器
    1. 发送ajax请求
    1. 订阅消息
    1. 自定义事件
4-2. 更新阶段:3个触发更新的方式【new props setState forceUpdate】
componentDidUpdate
   1. 发送ajax请求
   1. 更新本地存储数据
4-3. 卸载阶段: componentWillUnmount
- 关闭定时器
- 取消订阅
- 解绑自定义事件
ref:作用:获取真实dom
受控组件:状态 value 、checked 受控==》只读 ==》 onChange ==> 获取用户最新输入修改状态
非受控组件: defaultValue、defaultChecked
获取用户输入:ref获取
组件化的开发思路:
6-1. 静态布局:组件拆分
6-2. 首屏数据渲染:
- 数据结构分析:
- 分析数据定义在谁身上
6-3. 用户交互功能实现
- 描述:干了什么-》什么结果
- 拆分步骤:
- 给步骤匹配技术点
# 16. 函数组件
函数组件有缺陷:没有状态、没有生命周期 16.4版本以前
16.8版本出来之后,hook函数,使函数组件拥有了类组件的能力
- 状态:useState
- 生命周期:useEffect
- ref: useRef
# 16-1. useState
作用:让函数组件拥有状态
语法:
let [状态数据,设置状态的方法] = useState(初始值);
// 例如:
let [count, setCount] = useState(100)
setCount(要设置的count的最新的值)
// 例如:
setCount(count + 1)

setCount:函数调用后会发生两件事:
1. count状态数据的值改变
2. 触发函数组件的重新调用,完成重新渲染,页面更新
1
2
3
4
5
6
7
8
9
10
import React from 'react'
// 1. 导入useState函数
import { useState } from 'react'

export default function TestState() {
    // 2. 使用useState创建状态数据
    /**
     * let [状态变量,设置状态的方法] = useState(初始值)
     */
    // let res = useState(100);
    // console.log('res: ', res); //  [100, ƒ]
    let [count, setCount] = useState(99);
    return (
        <div>
            <p>state count : {count}</p>
            <p><button onClick={()=>{
                // setCount(要设置的count的最新的值)
                setCount(count+1)
            }}>count++</button></p>
        </div>
    )
}
2
3
4
5
6
7
8
9
10
11
12
13
14
15
16
17
18
19
20
21
22
# 16-1-1. useState-setCount 深入理解图示

# 16-1-2. 函数组件对状态设置进行了优化
当设置状态,状态没有改变的时候,只会多渲染一次
import React, { useState } from 'react'
import TestState from './components/TestState'

export default function App() {
    console.log('App run');
    let [count, setCount] = useState(88);
    let [msg, setMsg] = useState('atguigu');
    return (
        <div>
            <h3>App</h3>
            <p>app state count: {count}</p>
            <p>app state msg: {msg}</p>
            <p><button onClick={()=>{
                setCount(count+1)
            }}>count++</button></p>
            <p><button onClick={()=>{
                setMsg(msg + '!')
            }}>msg + '!'</button></p>

            {/* 函数组件的useState对状态的改变做了优化,当状态没有改变的时候,函数组件只多渲染一次 */}
            <p><button onClick={()=>{
                setCount(9999);
            }}>count赋值一个固定值</button></p>

            <TestState count={count} msg={msg}/>
        </div>
    )
}
2
3
4
5
6
7
8
9
10
11
12
13
14
15
16
17
18
19
20
21
22
23
24
25
26
27
28
# 16-1-3. setXxx 函数的两种用法
- setXxx(值)
- setXxx(回调函数): 回调函数的参数是最新缓存区中的值,回调函数的返回值,是要给缓存区设置的值
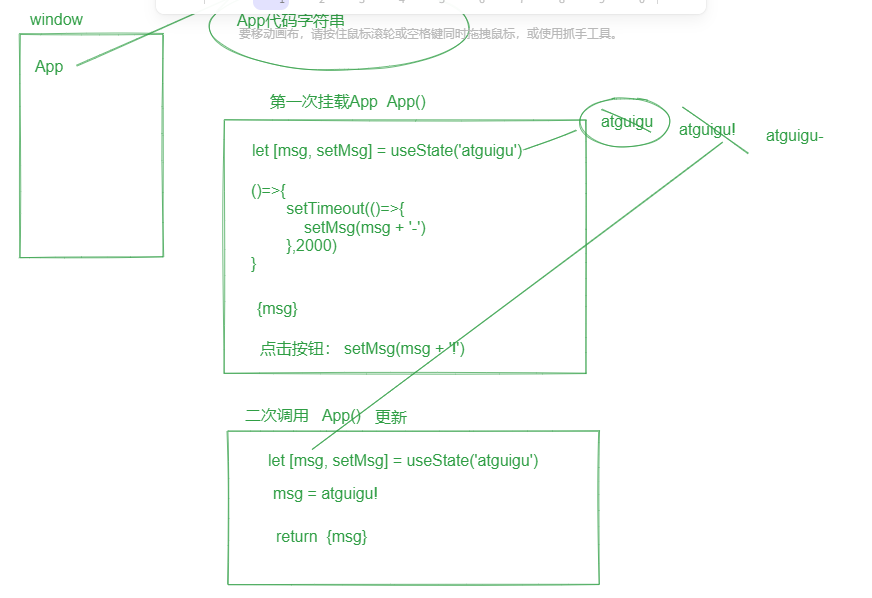
注意:当使用setXxx(值),发现效果值不对的时候,就要考虑是否出现了闭包,直接使用回调函数的写法即可
- 产生闭包,导致设置状态值不对的原理图
import React, { useEffect, useState } from 'react'

export default function App() {
    let [msg, setMsg] = useState('atguigu');

    useEffect(()=>{// componentDidMount 组件挂载完成后执行
        setTimeout(()=>{
            // 第一种用法:在有闭包的时候,值不对,只能取到初始值
            // setMsg(msg + '-')

            // 第二种用法, 接收一个回调函数作为参数,回调函数的形参是缓存区中最新变化后的msg值,回调函数的返回值,是要设置缓存区的最新的值
            setMsg((msg)=>{
                return msg + '-'
            })
        },2000)
    },[])

    return (
        <div>
            <p>msg: {msg}</p>
            <p><button onClick={()=>{
                setMsg(msg + '!')
            }}>msg + '!'</button></p>
        </div>
    )
}
2
3
4
5
6
7
8
9
10
11
12
13
14
15
16
17
18
19
20
21
22
23
24
25
26
# 16-2. useEffect
作用:函数组件中用来模拟生命周期
用法:
useEffect(回调函数)componentDidMount + all componentDidUpdate
useEffect(回调函数, [])componentDidMount
useEffect(回调函数, [state,props])componentDidMount + componentDidUpdate [数组中监听的]
useEffect(()=>{
	return ()=>{
		// componentWillUnmount
	}
})
1
2
3
4
5注意:同一个函数组件,可以有多个 useEffect,都生效
- App.jsx
// 1. 从react中解构 useEffect
import React, { useEffect, useState } from 'react'
import Son from './components/Son';

export default function App() {
    console.log('App run');
    let [count, setCount] = useState(100)
    let [msg, setMsg] = useState('atguigu')
    // 1. 组件挂载阶段生命周期
    // useEffect(() => {
    //     console.log('componentDidMount');
    // }, [])

    // 2. // componentDidMount + componentDidUpdate[count]
    // 一个函数组件可以有多个useEffect并且都生效
    // useEffect(() => {
    //     console.log('9999');
    // }, [count])

    // 3. componentDidMount + componentDidUpdate[所有的state,和所有的props]
    // useEffect(() => {
    //     console.log('没有第二个参数')
    // });


    return (
        <div>
            <p>count: {count}</p>
            <p>msg: {msg}</p>
            <p>
                <button onClick={() => {
                    setCount(count + 1)
                }}>count</button>

            </p>
            <p>
                <button onClick={() => {
                    setMsg(msg + '!')
                }}>msg</button>

            </p>
            <hr />
            {count % 2 === 0 && <Son count={count} />}
        </div>
    )
}
2
3
4
5
6
7
8
9
10
11
12
13
14
15
16
17
18
19
20
21
22
23
24
25
26
27
28
29
30
31
32
33
34
35
36
37
38
39
40
41
42
43
44
45
46
47
48
- Son.jsx
import React from 'react'
import { useEffect } from 'react'

export default function Son({ count }) {
    // useEffect(()=>{ // componentDidMount + componentDidUpdate[all state,all props]
    //     console.log('son 111')
    // })

    // 4. componentWillUnmount
    useEffect(() => {
        console.log('son componentDidMount')

        return () => {
            // componentWillUnMount
            console.log('son will unmount')
        }
    }, [])

    useEffect(()=>{
    // componentDidMount + componentDidUpdate
        console.log('son componentDidMount + son componentDidUpdate')
        return ()=>{// componentWillUnMount
            console.log('son will unmount2')
        }
    })
    return (
        <div>
            <p>son props count: {count}</p>
        </div>
    )
}
2
3
4
5
6
7
8
9
10
11
12
13
14
15
16
17
18
19
20
21
22
23
24
25
26
27
28
29
30
31
# 16-2-1. useEffect-电子时钟练习
import React, { useState } from 'react'
import moment from 'moment'
import { useEffect } from 'react';
export default function Timer() {
    let [nowDate, setNowDate] = useState(moment().format('YYYY-MM-DD HH:mm:ss'));

    useEffect(()=>{// componentDidMount
        let timer = setInterval(()=>{
            console.log('1111')
            setNowDate(moment().format('YYYY-MM-DD HH:mm:ss'))
        },1000)
        return ()=>{ // componentWillUnmount
            console.log(222);
            clearInterval(timer)
        }
    },[])
    return (
        <div>
            <p>当前日期是: {nowDate}</p>
        </div>
    )
}
2
3
4
5
6
7
8
9
10
11
12
13
14
15
16
17
18
19
20
21
22
# 16-3. useRef
创建一个
ref对象作用:
获取真实dom [必会]
步骤:
- 创建ref对象:
const inputRef = useRef()- 绑定
ref={inputRef }- 获取:
inputRef .current可以单独模拟componentDidUpdate
步骤:
创建
ref并赋初始值:const flagRef = useRef(true)useEffect(()=>{ if(flagRef.current){ flagRef.current = false; return; } // 以下代码只会在componentDidUpdate时运行 })1
2
3
4
5
6
7
8
# 16-3-1. 非受控组件
表单元素的值不受到状态数据的控制
具体实现手段:
- 状态数据是给 defaultValue或 defaultChecked赋值
- 通过ref对象获取用户最新的输入
import React, { useRef, useState } from 'react'

export default function App() {
    let [username, setUsername] = useState('atguigu');
    let [password, setPassword] = useState('123123');
    const save = (e)=>{
        e.preventDefault();
        console.log('username: ', usernameRef.current.value);
        console.log('password: ', passwordRef.current.value);
    }
    // 创建ref
    const usernameRef = useRef();
    const passwordRef = useRef();
    return (
        <div>
            <h3>非受控组件</h3>
            <form onSubmit={save}>
                <p>姓名: <input type="text" name="username" ref={usernameRef} defaultValue={username} /></p>
                <p>密码: <input type="text" name="password" ref={passwordRef} defaultValue={password} /></p>
                <p><button>保存</button></p>
            </form>
        </div>
    )
}
2
3
4
5
6
7
8
9
10
11
12
13
14
15
16
17
18
19
20
21
22
23
24
25
# 16-3-2. 受控组件
受控组件:表单的值受到状态数据的控制称为受控组件
实现步骤:
- 给 value 或 checked 赋值状态数据===》只读不可修改
- 定义 onChange 事件回调函数,函数中获取用户最新的输入改变状态数据
import React, { useState } from 'react'

export default function FormControl() {
    let [username, setUsername] = useState('atguigu');
    let [password, setPassword] = useState('123123');
    const save = (e) => {
        e.preventDefault();
        console.log('username: ', username);
        console.log('password: ', password);
    }
    function changeUsername(e) {
        setUsername(e.target.value)
    }
    function changePassword(e) {
        setPassword(e.target.value);
    }
    // 方式一:让函数名变成一个参数
    function change(e, fn) {
        fn(e.target.value);
    }
    // 方式二:高阶函数实现[柯里化函数]
    function higherChange(fn) {
        return (e) => {
            fn(e.target.value)
        }
    }
    return (
        <div>
            <h3>非受控组件</h3>
            <form onSubmit={save}>
                {/* <p>姓名: <input type="text" name="username"  value={username} onChange={changeUsername}/></p>
                <p>密码: <input type="text" name="password"  value={password} onChange={changePassword}/></p> */}

                <p>姓名: <input type="text" name="username" value={username} onChange={(e) => change(e, setUsername)} /></p>
                <p>密码: <input type="text" name="password" value={password} onChange={(e) => change(e, setPassword)} /></p>

                <hr />
                <h3>高阶函数实现</h3>
                <p>姓名: <input type="text" name="username" value={username} onChange={higherChange(setUsername)} /></p>
                <p>密码: <input type="text" name="password" value={password} onChange={higherChange(setPassword)} /></p>
                <p><button>保存</button></p>
            </form>
        </div>
    )

}
2
3
4
5
6
7
8
9
10
11
12
13
14
15
16
17
18
19
20
21
22
23
24
25
26
27
28
29
30
31
32
33
34
35
36
37
38
39
40
41
42
43
44
45
46
# 16-4. hook函数的使用原则
hook 函数和普通函数有什么区别?
答:区别就在于函数名,函数名是以 use开头后面链接 首字母大写的,react就认为这个函数是hook函数
usePosition hook
App Father 函数组件
fn save 普通函数
hook函数使用原则:
2-1. hook函数不能在类组件中使用,只能在函数组件中使用
2-2. hook函数不能在普通函数中使用,只能在其他hook函数中使用
2-3. hook函数数量必须是确定的
不能写在 if语句 或 for循环中
import React, { useRef, useState } from 'react'

export default function FunTest() {
    const usernameRef = useRef();
    // function save(){
    //     // 报错 :React Hook "useState" is called in function "save" that is neither a React function component nor a custom React Hook function.
    //     //   React Hook“useState”在函数“save”中调用,该函数既不是React函数组件,也不是自定义React Hook函数。
    //     let [count, setCount] = useState(100)
    // }

    function useSave(){ // useSave 是自定义的hook函数,内部可以使用 其他hook
        let [count, setCount] = useState(100)
    }

    // if(true){
    //     let [msg, setMsg] = useState('atguigu')
    // }

    for(let i=0; i<100;i++){
        let [msg, setMsg] = useState('atguigu')
    }
    return (
        <div>
            <button onClick={useSave}>点击</button>
        </div>
    )
}
2
3
4
5
6
7
8
9
10
11
12
13
14
15
16
17
18
19
20
21
22
23
24
25
26
27
28
# 16-5. 自定义hook
作用:可以将组件内相同的逻辑进行封装复用
hook/usePostion
import { useEffect, useState } from "react";

function usePosition() {
    let [x, setX] = useState(110)
    let [y, setY] = useState(110)
    useEffect(() => {// componentDidMount
        function move(e) {
            console.log(e.clientX, e.clientY);
            setX(e.clientX)
            setY(e.clientY)
        }
        window.addEventListener('mousemove', move)
        return () => {// componentWillUnmount
            window.removeEventListener('mousemove', move)
        }
    }, [])
    return {
        x,y
    }
}

export default usePosition;
1
2
3
4
5
6
7
8
9
10
11
12
13
14
15
16
17
18
19
20
21
22FuMing.jsx
import React, { useState } from 'react'
import { useEffect } from 'react'
import usePosition from '../hook/usePosition'

export default function FuMing() {
    let {x,y} = usePosition()
    return (
        <div style={{position:'absolute',left:x,top:y,width:100,height:100,border:'2px solid green'}}>
            FuMing
        </div>
    )
}
2
3
4
5
6
7
8
9
10
11
12
- Lili.jsx
import React, { useEffect, useState } from 'react'
import usePosition from '../hook/usePosition'
export default function Lili() {
    let {x,y} = usePosition();
    x -= 110
    y -= 110
    return (
        <div style={{ position: 'absolute', left: x, top: y, width: 100, height: 100, border: '2px solid red' }}>Lili</div>
    )
}
2
3
4
5
6
7
8
9
10
# 16-6. 作业
用函数组件的写法,重写 todolist
# 16-7. useContext
作用:祖先组件向任意后代组件通信
步骤:
创建context对象:
React.createContext()使用context.Provider 包裹后代组件 ,并绑定value数据
后代组件获取数据
- 导入context
- 使用useContext 函数,解析context对象获取数据
- src/context.js
// 1 导入createContext 函数
import {createContext} from 'react'
// 2 创建context对象
const context = createContext();
// 3. 将context对象暴露出去
export default context;
2
3
4
5
6
- App.jsx
import React from 'react'
// 4. 导入context对象
import context from './context'
import Father from './components/Father'

export default function App() {
    return (
        // 5. 使用Provider包裹 后代组件,被包裹的后代组件及其所有的子组件,都可以直接使用 value中的数据
        <context.Provider value={{username:'atguigu', age:10}}>
            <div>
                <h3>App</h3>
                <Father />
            </div>
        </context.Provider>
    )
}
2
3
4
5
6
7
8
9
10
11
12
13
14
15
16
- components/Son.jsx
import React, { useContext } from 'react'
// 6. 导入context对象
import context from '../context'
export default function Son() {
    // 7. 使用useContext hook函数,解析出context对象中绑定的value数据
    // let data = useContext(context)
    // console.log('data:', data);

    let {username, age} = useContext(context)
    return (
        <div>
            <p>username: {username}</p>
            <p>age: {age}</p>
        </div>
    )
}
2
3
4
5
6
7
8
9
10
11
12
13
14
15
16
# 16-8. pubsub
pub:publish 发布
sub:subscribe 订阅
安装pubsub: npm i pubsub-js
导入PubSub对象:
import PubSub from 'pubsub-js'消息的订阅:let 消息id = PubSub.subscribe('消息名', function(msg, data){ })
发布消息: PubSub.publish('消息名', 数据)
取消订阅:PubSub.unsubscribe(消息id) ==> 取消该消息id 的订阅
PubSub.unsubscribe(消息名) ==> 取消该消息名所有的订阅
取消所有的消息:PubSub.clearAllSubscriptions() 取消所有的消息
使用方式:
- 在组件生命周期挂载阶段==》订阅消息
- 在组件生命周期即将卸载阶段 ===》 取消订阅
# 16-9. ajax
react项目中使用axios发送ajax请求
如果是首屏数据渲染: 发送请求的位置==> componentDidMount
如果是用户交互:
axios基本使用:
需要进行基础配置:[baseURL、timeout]
1-1. defaults:
axios.defaults.baseURL = 'xxx.com:8080'1-2. create:
const request = axios.create({
    baseURL:'xxxx.com:8080',
    timeout:20000
})
//request 是一个简化版的 axios对象,没有cancelToken、all方法
//defaults进行的基础的基础路径配置,只能配置一个基础路径
// create可以创建多个对象,配置多个基础路径
1
2
3
4
5
6
7拦截器的配置
请求拦截器
在请求头里可以携带公共的参数 token
开启loading效果 NProgress
const request = axios.create({
    baseURL:'http://localhost:8080',
    timeout:2000
})
request.interceptors.request.use(config=>{
    // 1. 公共请求参数在请求头的携带,此处以token举例
    let token = localStorage.getItem('token');
    if(token){
        config.headers.token = token;
    }
    // 2. 开启loading效果
    NProgress.start();
    return config;
})
1
2
3
4
5
6
7
8
9
10
11
12
13
14响应拦截器
- 关闭loading
- 简化响应数据
- 进行token鉴权,重定向到 登录页面
- 进行统一错误处理
const request = axios.create({
    baseURL:'http://localhost:8080',
    timeout:2000
})
request.interceptors.response.use(response=>{
    // token鉴权,重定向处理
    if(response.statusCode === 401){ // 说明token过期或token异常
        // 重定向到login页面重新登录重新生成token
        // 清除掉本地存储的token
        localStorage.removeItem('token');
        //
        location.href = '/login.html'// 重定向到登录页
    }
    NProgress.done();// 关闭loading
    return response.data;// 简化响应数据
},error=>{
    / 进行统一错误处理
    console.log('error: ‘,error);
    // 阻止promise链条向下传递
    return new Promise(()=>{})
})
1
2
3
4
5
6
7
8
9
10
11
12
13
14
15
16
17
18
19
20
21axios 请求用法
axios函数式用法:===> 主要就是搞清楚 config配置
语法:axios(config)
config:
<font color='red'>method</font>: 请求方式 get 、post、patch、put、delete<font color='red'>url</font>: 请求链接<font color='red'>headers</font>: 请求头<font color='red'>params</font>: query参数<font color='red'>data:</font>请求体- cancelToken:取消请求
- timeout:请求超时
get
axios({
    method:'get',
    url:'zyx.com',
    params:{
        a:1,
        b:2
    }
})
// zyx.com?a=1&b=2
post
axios({
    method:'post',
    url:'zyx.com',
    data:{
        username:'zyx',
        age:20
    }
})
1
2
3
4
5
6
7
8
9
10
11
12
13
14
15
16
17
18
19
20axios对象式用法:分成两类,因为请求的参数不同
get、delete:
axios.get(url[,config])
axios.delete(url[,config])
1
2post、put、patch:
axios.post(url,data[,config])
axios.put(url,data[,config])
axios.patch(url,data[,config])
1
2
3
# 16-9-1. axios在项目中如何应用
- 在src/request目录中对 axios进行配置
- 使用配置后的request对象发送ajax请求
- src/request/index.js
// 做axios的基本配置:baseURL timeout  请求和响应拦截器
import axios from 'axios'
// 1. 安装nprogress  npm i nprogress
// 2. 导入nprogress
import NProgress from 'nprogress'
import 'nprogress/nprogress.css'

const request = axios.create({
    baseURL:'https://api.github.com',
    timeout:2000
})

// 配置请求拦截器
request.interceptors.request.use(config=>{
    // 1. 请求头中携带公共参数 token
    // 2. 开启loading效果
    NProgress.start()
    return config;
})

// 配置响应拦截器
request.interceptors.response.use(response=>{
    // 1. 关闭loading
    NProgress.done()
    // 2. 简化服务器数据
    return response.data;
})

export default request; // 将配置好的axios暴露
2
3
4
5
6
7
8
9
10
11
12
13
14
15
16
17
18
19
20
21
22
23
24
25
26
27
28
29
- App.jsx
import React, { useState } from 'react'
// 导入配置号的request
import request from './request'
export default function App() {
    let [count, setCount] = useState(100);
    return (
        <div>
            <p>count: {count}</p>
            <p><button onClick={async () => {
                let res = await request.get('/search/users', {
                    params: {
                        q: 'aa'
                    }
                })
                let totalCount = res.total_count
                console.log(totalCount);
                setCount(count + totalCount);

            }}>count+</button></p>
        </div>
    )
}
2
3
4
5
6
7
8
9
10
11
12
13
14
15
16
17
18
19
20
21
22
# 16-9-2. axios-repo案例练习
学习目标及知识点:
- request.js, 封装axios基础配置
- useEffect的回调函数不能使用 async直接修饰,需要单独定义async函数,手动调用
- loading 条件渲染
- src/request.js
// 做axios的基本配置:baseURL timeout  请求和响应拦截器
import axios from 'axios'
// 1. 安装nprogress  npm i nprogress
// 2. 导入nprogress
import NProgress from 'nprogress'
import 'nprogress/nprogress.css'

const request = axios.create({
    baseURL:'https://api.github.com',
    timeout:2000
})

// 配置请求拦截器
request.interceptors.request.use(config=>{
    // 1. 请求头中携带公共参数 token
    // 2. 开启loading效果
    NProgress.start()
    return config;
})

// 配置响应拦截器
request.interceptors.response.use(response=>{
    // 1. 关闭loading
    NProgress.done()
    // 2. 简化服务器数据
    return response.data;
})

export default request; // 将配置好的axios暴露
2
3
4
5
6
7
8
9
10
11
12
13
14
15
16
17
18
19
20
21
22
23
24
25
26
27
28
29
- src/App.js
import React, { useEffect, useState } from 'react'
import request from './request';

export default function App() {
    let [loading, setLoading] = useState(false);// 请求加载中的标识符
    let [repo, setRepo] = useState({});  // undefined.html_url
    // componentDidMount
    useEffect( () => { // useEffect中 的回调不能直接写 async, 需要单独定义async函数,在手动调用
        async function main(){
            // 开启loading
            setLoading(true);
            let {items} = await request.get('/search/repositories', {
                params: {
                    q: 'vue',
                    sort: 'stars'
                }
            })
            // 设置仓库状态
            setRepo(items[0])
            setLoading(false);
        }
        main()
    }, [])
    return (
        <div>
            {loading ? <h1>loading.....</h1> : <div>most star repo is <a href={repo.html_url}>{repo.name}</a></div>}
        </div>
    )
}
2
3
4
5
6
7
8
9
10
11
12
13
14
15
16
17
18
19
20
21
22
23
24
25
26
27
28
29
# 16-9-3. axios-发送请求开发思路
查看api接口地址:【请求方式、url、请求的参数、响应内容】
请求参数:
1-1. query参数:
axios.get(url, {params:{query参数}})1-2. path[params]参数:
axios.get('url/1/3')1-3. 请求体参数body:
- get/delete:
axios.get(url,{data:请求体参数})- post、put、patch:
axios.post(url, 请求体参数对象)封装api 请求的函数【使用该函数向api接口地址发送请求或取数据】
<font color='red'>请求函数返回的都是Promise对象</font>调用api函数获取数据
3-1. 在生命周期钩子中调用【首屏数据渲染】,一般是componentDidMount
3-2. 用户交互调用:用户点击了一个按钮、用户做了xxx操作
用请求回来的数据渲染页面:
4-1. 定义响应状态,使用插值语法渲染
- src/request/index.js
// 做axios的基本配置:baseURL timeout  请求和响应拦截器
import axios from 'axios'
// 1. 安装nprogress  npm i nprogress
// 2. 导入nprogress
import NProgress from 'nprogress'
import 'nprogress/nprogress.css'

const request = axios.create({
    baseURL:'https://api.github.com',
    timeout:2000
})

// 配置请求拦截器
request.interceptors.request.use(config=>{
    // 1. 请求头中携带公共参数 token
    // 2. 开启loading效果
    NProgress.start()
    return config;
})

// 配置响应拦截器
request.interceptors.response.use(response=>{
    // 1. 关闭loading
    NProgress.done()
    // 2. 简化服务器数据
    return response.data;
})
export default request; // 将配置好的axios暴露
2
3
4
5
6
7
8
9
10
11
12
13
14
15
16
17
18
19
20
21
22
23
24
25
26
27
28
- src/api/github.js
/**
 * 封装所有的github相关的请求函数
 *
 */
import request from '../request'
/**
 *
 * @param {*} keyword  关键字
 * @param {*} sortType  排序方式
 * @returns Promise对象
 *
 */
export function getRepo(keyword, sortType='stars'){
    return request.get('/search/repositories',{
        params:{
            q:keyword,
            sort:sortType
        }
    })
}
2
3
4
5
6
7
8
9
10
11
12
13
14
15
16
17
18
19
20
- App.jsx
import React, { useEffect, useState } from 'react'
import { getRepo } from './api/github';
export default function App() {
    useEffect(()=>{// componentDidMount
        async function main(){
            // 发送请求之前开启 loading
            setLoading(true);
            let res = await getRepo('vue')
            console.log('res: ', res);
            // 设置状态
            setRepo(res.items[0])
            // 请求结果回来之后,关闭loading
            setLoading(false);
        }
        main();
    },[])
    // 定义状态
    let [repo, setRepo] = useState({});
    // 定义一个条件渲染的状态
    let [loading, setLoading] = useState(false);

    return (
        <div>
            {loading ? <h1>loading....</h1> : <div>most stars repo is <a href={repo.html_url}>{repo.name}</a></div>}
        </div>
    )
}
2
3
4
5
6
7
8
9
10
11
12
13
14
15
16
17
18
19
20
21
22
23
24
25
26
27
# 16-10. 其他hook
# 16-10-1. useCallback
作用:缓存一个函数,避免组件更新后,函数被重复创建
语法: useCallback(()=>{}, [])
更新组件时,函数被重新创建的图示
如下图:App函数更新调用时, addCount会被重复创建
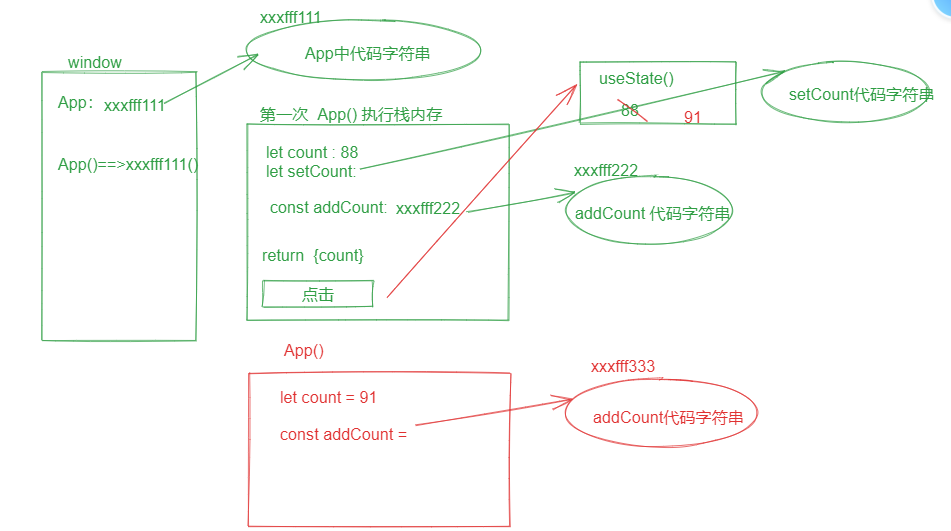
import React, { useCallback, useState } from 'react'

export default function App() {
    let [count, setCount] = useState(88)
    // 未优化前,addCount 在每一个 App() 调用执行栈中都有一份
    // const addCount = (num) => {
    //     setCount(count + num);
    // }

    /**
     * useCallback
     * 作用: 可以缓存一个函数
     */
    const addCount = useCallback((num)=>{
        // setCount(count + num); // 永远只能读取到初始值,所以需要使用如下回调函数的写法
        setCount(count=>{
            return count + num;
        })
    }, [])
    return (
        <div>
            <p>count : {count}</p>
            <p><button onClick={() => addCount(3)}>count +</button></p>
        </div>
    )
}
2
3
4
5
6
7
8
9
10
11
12
13
14
15
16
17
18
19
20
21
22
23
24
25
26
27
# 16-10-2. React.memo
类似于类的纯组件,当函数组件的 state 和 props没有改变的时候,不会触发重新渲染
语法:
React.memo(函数组件)
# 16-10-3. useMemo
作用:缓存一个函数计算的结果
语法: useMemo(函数,[监听的值])
# 17. react-router-dom 路由
路由的本质就是一个 key value 的映射关系
key--> url value--> react路由组件
当在访问url地址的时候,展示这个地址对应的react路由组件
前端路由模式,是解决SPA应用的手段 S single 单独 P page 页面 A application 应用
SPA- 单页面应用:只有一个 html的应用
react前端路由的基本概念:
Routes组件:相当于是路由器
Route组件: 相当于是路由,用来配置 url 和 路由组件的映射关系
path:指定url
element:指定 路由组件
例如:
<Routes>
	<Route path='/login' element={<Login/>}></Route>
     <Route path='/home'  element={<Home/>}></Route>
</Routes>
// localhost:3000/login   ===>  Login组件的内容
// localhost:3000/home   ===>  Home组件的内容
1
2
3
4
5
6
<BrowserRouter>组件,是一个容器组件,只有被该组件包裹的组件及其后代组件,才能进行路由切换react前端路由使用步骤:
安装:
npm i react-router-dom导入容器组件:
import {BrowserRouter} from 'react-router-dom'使用容器组件包裹根组件App
<BrowserRouter>
	<App/>
</BrowserRouter>
1
2
3创建路由组件:路由组件的存放目录
- src/pages or src/views : 路由组件
- src/components: 非路由组件
普通组件和路由组件有什么区别?路由组件有 key value 的配置
进行key - value 的路由配置
<Routes>
	<Route path='/login' element={<Login/>}></Route>
     <Route path='/home'  element={<Home/>}></Route>
</Routes>
//当对应的路由激活的时候,将对应路由组件替换掉 <Routes>组件所在位置
1
2
3
4
5Navigate重定向
 {/*  Navigate重定向  */}
{/* <Route path='/' element={<Navigate to='/home' />}></Route> */}
{/* <Route index={true} element={<Navigate to='/home' />}></Route> */}
<Route index element={<Navigate to='/home' />}></Route>
1
2
3
4404页面的配置
// 没有url 匹配成功的时候,会匹配到 * 展示页面找不到的路由组件
<Route path='*' element={<PageNotFound/>}></Route>
1
2NavLink-Link 实现无刷新跳转
NavLink 和 Link组件都能生成 a链接,NavLink有默认高亮样式 active, Link没有
import {NavLink, Link} from 'reactf-router-dom'

<h4>NavLink 跳转标签组件 高亮样式 active</h4>
<ul>
    <li><NavLink to="/home">首页</NavLink></li>
    <li><NavLink to="/login">登录页</NavLink></li>
    <li><NavLink to="/user">用户中心</NavLink></li>
</ul>

<h4>Link 跳转组件,没有 高亮样式</h4>
<ul>
    <li><Link to="/home">首页</Link></li>
    <li><Link to="/login">登录页</Link></li>
    <li><Link to="/user">用户中心</Link></li>
</ul>
1
2
3
4
5
6
7
8
9
10
11
12
13
14
15NavLink 自定义高亮样式类名
className 的值可以是一个回调函数,回调函数的参数是一个对象,对象中有一个 isActive的属性,值是布尔值,标识这当前路由是否是激活的。
回调函数的返回值,会成为 className的样式类名
<h4>NavLink 自定义高亮样式类名</h4>
<ul>
    <li><NavLink to="/home" className={({isActive}) => {
        return isActive ? 'myselfActive' : ''
    }}>首页</NavLink></li>
    <li><NavLink to="/login" className={({isActive}) => {
        return isActive ? 'myselfActive' : ''
    }}>登录页</NavLink></li>
    <li><NavLink to="/user" className={({isActive}) => {
        return isActive ? 'myselfActive' : ''
    }}>用户中心</NavLink></li>
</ul>
1
2
3
4
5
6
7
8
9
10
11
12路由表
路由表就是一个定义url 和路由组件映射关系对象的数组
使用方式:
定义路由表数组
useRoutes 生成映射关系
useRoutes(路由表数组) ==> <Routes><Route></Route></Routes>1// src/routes/index.js const routes = [ { path:'/login', element:<Login/> }, { path:'/home', element:<Home/> }, { // 重定向 index:true, // path:'/' element:<Navigate to='/home' /> }, { // 404配置 path:'*', element:<PageNotFound/> } ]1
2
3
4
5
6
7
8
9
10
11
12
13
14
15
16
17
18
19
20
21二级路由:
创建二级路由组件
children 属性配置二级路由:
routes=[
    {
        path:'/home',
        children:[
            {
                path:'/home/news',
                // 简写==> path:'news',前面不能有 / ,否则会认为是一级路由
                element:<News/>
            }
        ]
    }
]
1
2
3
4
5
6
7
8
9
10
11
12展示二级路由:
编程式导航:
NavLink Link ===> a标签,进行无刷新跳转
使用js进行跳转:
let navigate = useNavigate()
if(localStorage.getItem('token')){
    navigate('/user');
}
1
2
3
4编程式导航和普通的跳转链接有什么差别?
编程式导航通过js进行跳转,可以加一些判断条件, 实现有条件的进行跳转
是否替换当前历史记录
- 不替换-新增【默认】:
navigate(url) 或 navigate(url, {replace:false})1
- 替换当前历史记录跳转
navigate(url, {replace:true})1前进、后退
前进:
navigate(1)后退:
navigate(-1)前进n步:
navigate(n)路由传参:
13-1. path-params参数
参数通过url路径传递: /user/1/atguigu
<Link to='/home/message/path/1/atguigu'>path参数的传递和接收</Link>1需要配置路由占位符
children:[
    {
        // path-params参数需要配置路径占位符
        path:'/home/message/path/:id/:school',
        element:<PathTest/>
    }
]
1
2
3
4
5
6
7在路由组件中如何接收:useParams() 接收
// 解构接收path参数
let {id, school} = useParams();
1
213-2. query参数
在链接中通过 url?key=value&key2=value2&....
<Link to="/home/message/query?username=atguigu&age=20">query参数的传递</Link>1路由配置:无需配置参数占位符
{
    path:'/home/message/query',
    element:<QueryTest/>
}
1
2
3
4路由组件中如何获取?useSearchParams
let [searchQuery, setSearchQuery] = useSearchParams();
let username = searchQuery.get('username')
let age = searchQuery.get('age')

// 设置query参数
setSearchQuery('?username=尚硅谷&age=100')
1
2
3
4
5
613-3. state参数[了解]
注意:state参数可以传递复杂数据类型,state参数不会出现在地址栏中
如何传递:
<Link to='/home/message/state' state={数据}>state参数</Link>路由配置:无需特殊配置
{
    path:'/home/message/state',
    element:<StateTest/>
}
1
2
3
4路由组件中接收:useLocation()
let { state: { id, title, isDone } } = useLocation();1路由懒加载【按需加载】
依赖于 react包中的 lazy函数、Suspense组件
import {lazy, Suspense} from 'react'
使用lazy函数加载路由组件
const About = lazy(() => import("../pages/About"));
const Message = lazy(() => import("../pages/Message"));
const PathTest = lazy(() => import("../pages/PathTest"));
const QueryTest = lazy(() => import("../pages/QueryTest"));
const StateTest = lazy(() => import("../pages/StateTest"));
1
2
3
4
5使用Suspense 包裹路由组件,fallback属性,当懒加载的路由组件没有加载完成的时候,显示的内容
function load(Com) {
    return (
        <Suspense fallback={<div>组件正在加载中....</div>}>
            <Com />
        </Suspense>
    )
}

element: load(Message)
1
2
3
4
5
6
7
8
9html5 history模式 和 hash路由模式
BrowserRouter: html5-history模式
localhost:3000/home/news1HashRouter: hash路由模式 [了解]
localhost:3000/#/home/news1
# 18. redux-toolkit
- redux toolkit: 官方提供的redux工具包
作用:对数据状态进行集中式管理
- react-redux:在react中更方便的使用redux
# 18-1. redux 核心概念
数据仓库:store 项目经理
数据切片:slice 子项目
减速器 :reducer 程序员
动作行为:action 需求文档
actionCreator action的创造者 产品经理
分发: :dispatch 指派任务[项目经理]
# 18-2. redux-toolkit基本使用
安装:
npm install @reduxjs/toolkit导入包:
import {createSlice, configureStore} from '@reduxjs/toolkit'createSlice: 创建切片的函数
configureStore: 创建仓库的函数
# 18-3. 创建切片
// 1. 导入 createSlice包
import {createSlice} from '@reduxjs/toolkit'
import { countSubscriptions } from 'pubsub-js';

// 2. 创建切片
const countSlice = createSlice({
    name:'count',// name:指定切片名
    initialState:{// 切片数据
        num:99,
        msg:'atguigu'
    },
    reducers:{
        /**
         *
         * @param {*} state  切片状态数据
         * @param {*} action {type:'count/addNum',payload:数据}
         * 没创建一个reducer方法,redux会自动帮咱们创建一个同名的方法,在切片的 actions属性上,该方法的身份是,actionCreator
         */
        addNum(state, action){
            state.num += action.payload
        },
        changeMsg(state, action){
            state.msg += action.payload
        }
    }
})

console.log(countSlice.actions);
// 获取产品经理
let {addNum, changeMsg} = countSlice.actions; // 此处 addNum 和 changeMsg身份都是actionCreator
// actionCreator函数,调用的结果,会返回一个 action对象 {type, payload:调用actionCreator传的参数}

console.log('addNum(10): ',addNum(10));// {type: 'count/addNum', payload: 10}
console.log('changeMsg("+")', changeMsg('+')); //{type: 'count/changeMsg', payload: '+'}
2
3
4
5
6
7
8
9
10
11
12
13
14
15
16
17
18
19
20
21
22
23
24
25
26
27
28
29
30
31
32
33
34
# 18-3. 创建仓库-获取仓库数据-修改切片状态
创建仓库: configureStore
获取仓库数据: store.getState()
修改状态: store.dispatch(actionCreator(payload))
监听和取消监听仓库数据变化
// 监听
const unsubscribe = store.subscribe(()=>{

})
// 取消监听
unsubscribe();
1
2
3
4
5
6
// 1. 导入 createSlice包
import {createSlice, configureStore} from '@reduxjs/toolkit'

// 2. 创建切片
const countSlice = createSlice({
    name:'count',// name:指定切片名
    initialState:{// 切片数据
        num:99,
        msg:'atguigu'
    },
    reducers:{
        /**
         *
         * @param {*} state  切片状态数据
         * @param {*} action {type:'count/addNum',payload:数据}
         * 没创建一个reducer方法,redux会自动帮咱们创建一个同名的方法,在切片的 actions属性上,该方法的身份是,actionCreator
         */
        addNum(state, action){
            state.num += action.payload
        },
        changeMsg(state, action){
            state.msg += action.payload
        }
    }
})
// 获取actionCreator
let {addNum, changeMsg} = countSlice.actions;

const userSlice = createSlice({
    name:'user',
    initialState:{
        username:'atguigu',
        age:10
    },
    reducers:{
        addAge(state, {payload}){
            state.age += payload
        }
    }
})
// actionCreator  addAge
const {addAge} = userSlice.actions;

// 创建仓库
const store = configureStore({
    reducer:{
        count: countSlice.reducer,
        user: userSlice.reducer
    }
})
console.log('store: ',store);

// 获取仓库数据  store.getState()
console.log('store.getState(): ', store.getState());

// 如何修改切片数据    只有reducer中的方法【程序员才能修改数据】
// 项目经理分配一个任务给产品经理,产品经理创建一个需求,将需求给程序员开发

store.dispatch(addNum(3));// addNum(3) ==> {type:'count/addNum',payload:3}
// 触发 count切片中的addNum函数的执行,并且将 action对象作为第二个参数传过去


console.log(store.getState());

// 监听store中数据的变化,当仓库数据发生修改时,会触发回调函数的执行。返回值是取消监听的函数,如果调用执行,那么就会取消监听
const unsubscribe = store.subscribe(()=>{
    console.log('subscribe: ',store.getState());
})

store.dispatch(addNum(5))
unsubscribe();// 取消监听
store.dispatch(addNum(7))
2
3
4
5
6
7
8
9
10
11
12
13
14
15
16
17
18
19
20
21
22
23
24
25
26
27
28
29
30
31
32
33
34
35
36
37
38
39
40
41
42
43
44
45
46
47
48
49
50
51
52
53
54
55
56
57
58
59
60
61
62
63
64
65
66
67
68
69
70
71
72
73
# 18-4. store模块化使用
# 目录结构
src
  |- store                    redux数据仓库根目录
  |    |- index.js            创建仓库
  |    |- slice               切片目录
  |    |    |- countSlice.js  切片模块文件
2
3
4
5
6
- src/store/index.js
import { configureStore } from "@reduxjs/toolkit";
import count from "./slice/countSlice";
import user from "./slice/userSlice";
// 创建仓库
const store = configureStore({
    reducer:{
        count,
        user
    }
})
export default store;
2
3
4
5
6
7
8
9
10
11
- src/store/slice/countSlice.js
import { createSlice } from '@reduxjs/toolkit'

// 2. 创建切片
const countSlice = createSlice({
    name: 'count',// name:指定切片名
    initialState: {// 切片数据
        num: 99,
        msg: 'atguigu'
    },
    reducers: {
        /**
         *
         * @param {*} state  切片状态数据
         * @param {*} action {type:'count/addNum',payload:数据}
         * 没创建一个reducer方法,redux会自动帮咱们创建一个同名的方法,在切片的 actions属性上,该方法的身份是,actionCreator
         */
        addNum(state, action) {
            state.num += action.payload
        },
        changeMsg(state, action) {
            state.msg += action.payload
        }
    }
})
// 获取actionCreator
export const { addNum, changeMsg } = countSlice.actions;
export default countSlice.reducer;
/**
 * 对于切片,需要暴露如下东西:
 * 1. 暴露切片中的reducer对象:默认暴露
 * 2. 暴露actionCreator       分别暴露
 *
 */
2
3
4
5
6
7
8
9
10
11
12
13
14
15
16
17
18
19
20
21
22
23
24
25
26
27
28
29
30
31
32
33
- src/slice/userSlice.js
import { createSlice } from "@reduxjs/toolkit";

const userSlice = createSlice({
    name:'user',
    initialState:{
        username:'atguigu',
        age:10
    },
    reducers:{
        addAge(state, {payload}){
            state.age += payload
        }
    }
})
// actionCreator  addAge
export const {addAge} = userSlice.actions;
export default userSlice.reducer;
2
3
4
5
6
7
8
9
10
11
12
13
14
15
16
17
- src/index.js 测试使用 store
// 导入仓库
import store from './store'
import {addNum} from './store/slice/countSlice'
const unsubscribe = store.subscribe(()=>{
    console.log('subscribe: ',store.getState());
})
store.dispatch(addNum(5))
store.dispatch(addNum(7))
2
3
4
5
6
7
8
# 18-5. react-redux基本使用
步骤:
安装:
npm i react-redux导入Provider组件并绑定store
import {Provider} from 'react-redux'
<Provider store={store}>
    <App/>
</Provider>
1
2
3
4读取数据:useSelector
/**
 * 作用:获取redux中的状态数据
 * 语法:useSelector(回调函数)
 *       回调函数的参数,就是整个仓库的数据 state
 *       回调函数的返回值,就是useSelector函数调用的返回值
 *
 */
// let res = useSelector(state=>{
//     console.log('state: ', state);
//     return state;
// })

// let count = useSelector(state=>state.count) // 获取count切片的数据
// let user = useSelector(state=>state.user);// 获取user切片的数据
let {num} = useSelector(state=>state.count);
1
2
3
4
5
6
7
8
9
10
11
12
13
14
15修改数据: useDispatch()
// useDispatch 创建一个dispatch函数
const dispatch = useDispatch();
dispatch(actionCreator(payload))
1
2
3
# 18-6. redux-异步操作
- 创建异步actoinCreator:createAsyncThunk
- 创建异步的reducer: extraReducers:
注意:
- 异步操作的代码,卸载异步的 actionCreator中
- extraReducers ==> fulfilled 分支 action.payload 值就是 异步actionCreator 成功promise的结果值。
- 异步actionCreator 如何创建
/**
 * 想实现异步的操作,需要有异步的产品经理[actionCreator] 和 异步的程序员
 *
 * 异步的actionCreator:需要手动创建  createAsyncThunk 函数创建,
 * 异步的reducer: 需要配置在 extraReducers中, 【pending、fulfilled、rejected 】
 */

// 创建异步的产品经理
export const asyncAddNum = createAsyncThunk('count/addNum', async (payload) => {
    let { data } = await axios.get('https://api.github.com/search/users?q=aa')
    // console.log('data: ',data);
    return data.total_count;// 会得到一个成功的promise,成功的结果值是 total_count
    // return Promise.reject('error123123')
})

export const asyncDecNum = createAsyncThunk('count/decNum', (payload)=>{
    return new Promise((resolve, reject)=>{
        setTimeout(()=>{
            resolve(payload)
        },2000)
    })
})
2
3
4
5
6
7
8
9
10
11
12
13
14
15
16
17
18
19
20
21
22
- 异步reducer如何创建
// 异步的程序员
extraReducers: (builder) => {
    builder
        .addCase(asyncAddNum.pending, (state, action) => {
            console.log('pending action: ', action);
        })
        // 如果是一个成功的promise,成功的结果值就是action的payload属性值
        .addCase(asyncAddNum.fulfilled, (state, action)=>{
            console.log('fulfilled action', action);
            state.num += action.payload
        })
        .addCase(asyncAddNum.rejected, (state, action)=>{
            console.log('rejected action: ', action);
        })
        .addCase(asyncDecNum.fulfilled, (state, {payload})=>{
            state.num -= payload
        })
}
2
3
4
5
6
7
8
9
10
11
12
13
14
15
16
17
18
# 18-7. reduxjs/toolkit 小结
store:
const store = configureStore({
    reducer:{
        count
    }
})
1
2
3
4
5slice:
1. name:
2. state:
3. reducer: 同步的程序员 【同步的actionCreator redux帮咱们创建在了切片的actions属性上】
4. extraReducers: 异步的程序员
5. 手动定义异步的actionCreator【createAsyncThunk】
切片中需要向外暴露的
   1. 默认暴露 reducer:   export default countSlice.reducer
   1. 分别暴露同步的actionCreator: export const {addNum, decNum} = countSlice.actions
   1. 分别暴露异步的actionCreator:
react-redux
- Provider: 包裹根组件 绑定store
- useSelector: 获取状态数据
- useDispatch:创建dispatch函数
修改状态数据:
- 同步: dispatch(同步actionCreator(payload))
- 异步:dispatch(异步的actionCreator(payload))
# 附录
# 1. 常见问题
# 1-1. can't resolve
can't resolve : 不能够解析 xxx文件 ===》找不到 xxx文件
错误原因:
- 文件名写错了或者是目录写错完了
- 不存在这个目录或者是文件
# 1-2.
